DeutschEnglish

Submenu

 - - - By CrazyStat - - -

6. April 2021

Open PHP Scripts in Browser from Windows Explorer

Filed under: PHP,Windows — Tags: , , , , , — Christopher Kramer @ 19:07

PHP is a scripting language, so a PHP parser is needed to run PHP scripts. Furthermore, a webserver like Apache is required to run web applications written in PHP. We assume you already have all that installed (e.g. you installed xampp). Now you have php files in your htdocs-folder and want to open them in the browser, parsed by php and served by your local webserver? But that requires the browser to point to http://localhost/ instead of file://C:/xampp/htdocs/. I solved this by opening a tiny PHP script in the browser that redirects to the correct location. Here is how to set it up:

  1. Download FileTypesMan (direct download link for x64)
  2. Unzip FileTypesMan and run FileTypesMan.exe . Confirm the UAC prompt.
  3. Click Edit / Find and enter “php” in the search field
  4. If you do not find a row with the extension “.php” in the table, then:
    a) Double click a php-file in explorer and assign a default application to launch. This could be a text editor like notepad++, and IDE like Visual Studio Code, or notepad.exe.
    b) In FileTypesMan click File / Refresh Desktop now and search again for “php”. You should find it now.
  5. While the row “.php” is selected, click Actions / New action.
  6. Assign an action name like Parse php and open in Firefox
  7. Click “Browse…” and select the executable of the browser that should get launched, e.g. C:\Program Files\Mozilla Firefox\firefox.exe
  8. Now change the Command-Line so that after the path to the browser, the first argument is "http://localhost/load.php?file=%1" . This makes the browser open said php-file parsed by localhost and pass the filepath as parameter file. It should look similar as in the screenshot.
  9. Select “Default Action” if you want this action to happen on double-click.
  10. Click OK. You may create similar actions for other browsers.
  11. Drop the file load.php in your htdocs document root folder with the following content:
<?php
$htdocs = $_SERVER["DOCUMENT_ROOT"];
$webserver = "http://".$_SERVER["HTTP_HOST"];
if(empty($_GET['file'])) $redirectTo = $webserver;
else {
    $file = trim(str_replace("%20", " ", str_replace("\\\\", "/", str_replace(DIRECTORY_SEPARATOR, '/', $_GET['file']))));
	$inDocumentRoot = strpos($file, $htdocs)!==false;
	if(!$inDocumentRoot) { 
	    die('The file is not in the document root!');
	}
	$redirectTo = $webserver.str_replace($htdocs,"",$file);
}
header('Location: '.$redirectTo);
exit;

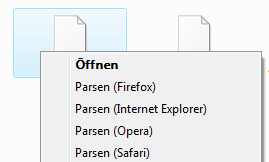
Now you can launch php files right from the context menu in Explorer or through double click. You can delete FileTypesMan now.

Please drop a comment it this made your day.
Recommendation

Try my Open Source PHP visitor analytics script CrazyStat.

13. June 2017

Putty: Automatically start an SSH tunnel without a window (headless)

Filed under: Windows — Tags: , , , , , , , — Christopher Kramer @ 21:23

You use Putty to tunnel some port through SSH to a foreign network but manually starting it again and again annoys you and the window gets in the way? Here is your solution. It requires admin rights and is tested on Windows 7 Professional only. Please let us know in the comments whether it works the same in your windows version.

  1. Set up your SSH tunnel in putty and save it as a session (e.g. with the name mytunnel). Make sure to use keys for authentication and that the key does not require a passphrase. Without a window there is no way to enter the passphrase of course ;-). If you worry about security, best restrict the rights of the user that you connect to as much as possible.
  2. Press WINDOWS + R and enter Taskschd.msc to start the Windows Task Scheduler. Accept the UAC prompt, if any.
  3. In the tree on the left, select the folder Task Scheduler Library.
  4. On the right, click Create task…
  5. Enter a name like SSH Tunnel.
  6. Choose Run whether user is logged on or not (this is important to make sure the window does not pop up).
  7. Click the checkbox Do not store the password. The process will only have access to local resources.
  8. Switch to the Triggers tab.
  9. Click the New… button
  10. Select a trigger that suits your needs. I chose Daily,  recur every 1 days, Repeat task every 30 minutes for the duration of 1 day and stop all running tasks at the end of repetition interval.  Click OK. This will restart the SSH tunnel every 30 minutes, so you might be left without connection for at most 30 minutes. You could add another trigger at startup or login if you need that.
  11. Switch to the Actions tab.
  12. Click the New… button.
  13. Choose Start a program as action.
  14. Use the Browse button to find plink.exe, which belongs to putty, you can download it here.
  15. Next to Add arguments, enter the name of your putty session (e.g. mytunnel).
  16. Click OK.
  17. You can adjust more settings like in the Conditions tab, unselect Start the task only if the computer is on AC power to make sure your tunnel also starts when your laptop is operating on battery, if necessary.
  18. Click OK.
  19. Right click your task and select Run to see if it works as expected. No window should come up but your ssh tunnel should be working.

Let me know if this saved your day and what you are using it for. I am using this to create an SSH tunnel for Sophos Endpoint Security and Control to fetch its updates from a server that is only accessible from an internal network.

30. July 2015

eclipse: Java was started but returned exit code=-13

Filed under: Windows — Christopher Kramer @ 22:47

What the hell does this mean? For me, it meant: Eclipse 64bit and Java 32bit installed.

I solved this by downloading and installing the 64bit java version instead.

Hope this helps somebody 😉

21. May 2015

wp-cli: syntax error, unexpected ‘?’, error connecting to the database

Filed under: Server Administration,Windows,Wordpress — Christopher Kramer @ 10:55

Running wp-cli on a website that was set up by somebody else resulted in a strange error:

PHP Parse error:  syntax error, unexpected '?' in phar:///usr/local/wp-cli.phar/php/wp-cli.php(23) : eval()'d code on line 1
Error:
<h1>Fehler beim Aufbau der Datenbank-Verbindung</h1>
...

The database settings in wp-config.php were all correct and WordPress was also working, so this did not seem to be the problem. In the end, I found out the reason was a byte order mark at the beginning of wp-config.php that had been inserted probably by Windows Editor. To solve the issue, the easiest way is to open the file in a good editor, for Windows I recommend PSPad, copy everything into the clipboard (CTRL +A, CTRL + C), create a new empty file (CTRL + N), paste everything (CTRL + V), save it (CTRL + S) as wp-config.php and upload the file.


6. March 2015

TortoiseGit: Windows for pull, push etc. take 5 minutes to appear, commit does not work

Filed under: Windows — Tags: , , , , — Christopher Kramer @ 21:14

My TortoiseGit showed a strange behaviour: When I tried to push or pull, the window took exactly 5 minutes to appear. The commit window did not appear any more. Reinstalling TortoiseGit did not fix the issue. I used the git Bash as a workaround for some time until I found a fix: TortoiseGit was not able to write into its temp directory because the security settings (NTFS rights) were somehow messed up. For the C:\Users\MyUser\AppData\Local\Temp\TortoiseGit, I added my user with full access rights and everything is now working again :).

Hope this helps someone to fix this faster in case someone has the same issue.

10. January 2015

Retro game Ignition / Bleifuss Fun under Windows 7 using DOSBox

Filed under: Windows — Tags: , , , , , — Christopher Kramer @ 15:37

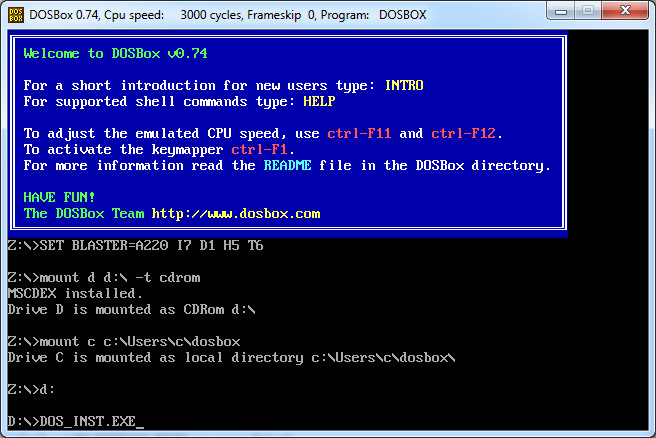
Remember this retro game?

bleifuss fun

When I was a child, I used to play this with my friends in split screen, which is fun 😀

I just found the old CD and wanted to get it running. This is the way that worked out:

  1. Download and install DOSbox
  2. Create an directory somewhere, e.g. “C:\Users\foo\dosbox”
  3. Start DOSbox
  4. Insert the Bleifuss Fun / Ignition CD into your CD drive (say it has drive D:)
  5. Mount the CD in DOSBox:
    mount d d:\ -t cdrom
  6. Mount the directory you created in step 2 as c:
    mount c c:\Users\foo\dosbox
  7. Switch to the CD-Rom by typing:
    d:
  8. Start the installation by typing:
    DOS_INST.EXE

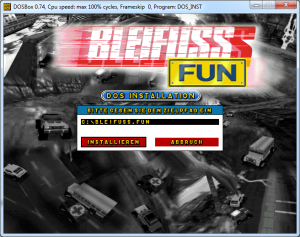
  9. Go through the installation by pressing Enter, leaving the default location (C:\BLEIFUSS.FUN\ will end up in C:\Users\foo\dosbox\BLEIFUSS.FUN on your drive)
    bleifuss2
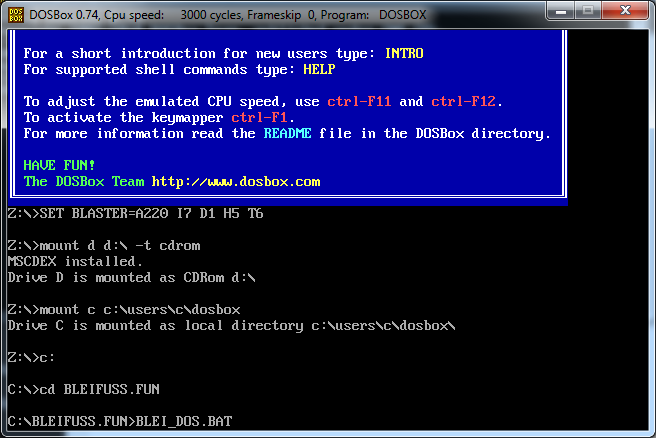
  10. Go into the installation directory
    c:
    cd BLEIFUSS.FUN
  11. Switch into Fullcreen: ALT + Enter
  12. Start the game by typing
    BLEI_DOS.BAT

bleifuss3

You can switch back from fullscreen with Alt + Enter and kill dosbox with CTRL + F9

You can increase the screen resolution under options to 800 x 600 to get the graphics a little better.

Next time you run the game, start Dosbox, insert the CD, mount it, mount c, go into the installation directory and start the game:

bleifuss_start

If you don’t want to insert the CD every time or don’t have a CD drive anymore, you can create an image of the CD using Daemon Tools and mount this into a virtual CD drive and mount this in DOSBox.

Of course this should work on any OS where DOSBox is running.

Have fun!

7. November 2014

Amazon Instant Video and Error 1002

Filed under: Uncategorized,Windows — Tags: , , , , , — Christopher Kramer @ 20:40

Recently, when trying to watch a video in Amazon Instant Video, I only got Error 1002. I tried Firefox, Chrome, Opera and Internet Explorer and none of them worked. I reinstalled Silverlight and this also did not help.

Then finally I found the reason: Amazon still seems to use SSL 3 for Instant Video streams! Because Google recently reported security problems with SSL 3.0 (known as the POODLE security vulnerability), I disabled SSL 3.0 in all browsers including Internet Explorer. No matter what browser you use, Silverlight will use Internet Explorer’s settings and will not use SSL 3.0 any more. Re-enabling SSL 3.0 again in the Internet Explorer settings fixed the problem with Amazon Instant Video. As I am not really using Internet Explorer anyway, I don’t care much about this, but Amazon should really work on this to make Instant Video available without the need to enable SSL 3.0.

Happy streaming!

24. June 2014

Inkscape: Problem importing PDF

Filed under: Windows — Tags: , , , , , , , , — Christopher Kramer @ 18:39

I just had problems importing a PDF into Inkscape. The PDF was an image of a graph generated by igraph for R. When importing, the circles of the vertices got replaced by the letter “q”.

I found the following workaround: I printed the PDF into a new PDF using FreePDF. The resulting PDF could then be imported into Inkscape without problems.

My original problem was that I wanted to include the graphs from igraph for R in Powerpoint as a vector graphic. As Powerpoint cannot include PDFs as graphics, I wanted to save the graphs as emf-Files. But the emf-Files exported by igraph for R look completely messed up when imported in Powerpoint. The PDFs exported by igraph for R are fine, so I wanted to import them into Inkscape and save them as emf. A bit of a long way, but it works and it does not result in an ugly pixel graphic.

Maybe somebody has similar problems and finds this useful.

9. June 2014

Windows 7: On a multi-screen setup, place windows at one half of a screen

Filed under: Windows — Tags: , , , , , , , — Christopher Kramer @ 11:08

With Windows 7, you can easily move windows on one half of the screen by dragging them to the left or right edge of the screen. This is called “Snap” and is very handy. Watch Microsoft’s video on Snap if you don’t know it yet.

But on a multi-screen setup with two screens side-by-side, you can only place a window at the right half of the right screen or the left half of the left screen with Snap. You cannot place a window at the left half of the left screen because there is no “magic edge” there. Of course you can move and resize it manually. But there is a faster way:

[Windows-Key] + [Left arrow]

This places the window at these positions:

  1. Left half of left screen
  2. Right half of left screen
  3. Left Screen
  4. Left half of left screen
  5. Right half of right screen
  6. Right screen

Just press [Windows]+[Left] again to move it to the next position listed above. You can press [Windows] + [Right arrow] to move it the other way round (starting to the right half of right screen).

I don’t know if any other Windows version supports this as well, I guess at least Windows 8 supports it as well (in desktop mode).

Happy window-moving! 🙂

16. May 2014

Inkscape: Dialog windows do not open on multi-screen setups

Filed under: Windows — Tags: , , , , , , — Christopher Kramer @ 17:06

I am using a multiscreen setup with one small landscape screen and one big portrait screen.

When I try to open a dialog like the Inkscape settings or the document settings in Inkscape, it does not open. Or more precisely, I cannot see it because it is positioned outside the visible area. I have this problem with current Inkscape 0.48.4 on Windows 7 Professional 64bit.

The bug is known for some time but unfortunately not fixed.

But I found a great and easy workaround which I want to share with you here: Whenever you cannot see a window because it is offscreen, press [Windows-Key] [arrow-up-key]. This shortcut maximizes the current window and you can use it normally. This probably only works on Windows 7 and newer.

You can also use the left or right arrow-key to position the window on the left or right half of the screen.

Happy drawing! 🙂

Older Posts »