DeutschEnglish

Submenu

 - - - By CrazyStat - - -

6. April 2021

Open PHP Scripts in Browser from Windows Explorer

Filed under: PHP,Windows — Tags: , , , , , — Christopher Kramer @ 19:07

PHP is a scripting language, so a PHP parser is needed to run PHP scripts. Furthermore, a webserver like Apache is required to run web applications written in PHP. We assume you already have all that installed (e.g. you installed xampp). Now you have php files in your htdocs-folder and want to open them in the browser, parsed by php and served by your local webserver? But that requires the browser to point to http://localhost/ instead of file://C:/xampp/htdocs/. I solved this by opening a tiny PHP script in the browser that redirects to the correct location. Here is how to set it up:

  1. Download FileTypesMan (direct download link for x64)
  2. Unzip FileTypesMan and run FileTypesMan.exe . Confirm the UAC prompt.
  3. Click Edit / Find and enter “php” in the search field
  4. If you do not find a row with the extension “.php” in the table, then:
    a) Double click a php-file in explorer and assign a default application to launch. This could be a text editor like notepad++, and IDE like Visual Studio Code, or notepad.exe.
    b) In FileTypesMan click File / Refresh Desktop now and search again for “php”. You should find it now.
  5. While the row “.php” is selected, click Actions / New action.
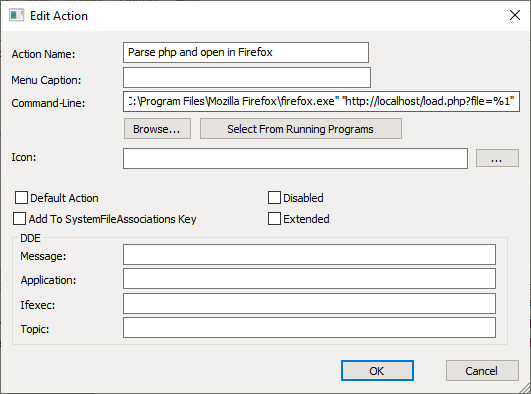
  6. Assign an action name like Parse php and open in Firefox
  7. Click “Browse…” and select the executable of the browser that should get launched, e.g. C:\Program Files\Mozilla Firefox\firefox.exe
  8. Now change the Command-Line so that after the path to the browser, the first argument is "http://localhost/load.php?file=%1" . This makes the browser open said php-file parsed by localhost and pass the filepath as parameter file. It should look similar as in the screenshot.
  9. Select “Default Action” if you want this action to happen on double-click.
  10. Click OK. You may create similar actions for other browsers.
  11. Drop the file load.php in your htdocs document root folder with the following content:
<?php
$htdocs = $_SERVER["DOCUMENT_ROOT"];
$webserver = "http://".$_SERVER["HTTP_HOST"];
if(empty($_GET['file'])) $redirectTo = $webserver;
else {
    $file = trim(str_replace("%20", " ", str_replace("\\\\", "/", str_replace(DIRECTORY_SEPARATOR, '/', $_GET['file']))));
	$inDocumentRoot = strpos($file, $htdocs)!==false;
	if(!$inDocumentRoot) { 
	    die('The file is not in the document root!');
	}
	$redirectTo = $webserver.str_replace($htdocs,"",$file);
}
header('Location: '.$redirectTo);
exit;

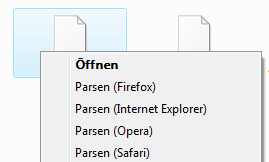
Now you can launch php files right from the context menu in Explorer or through double click. You can delete FileTypesMan now.

Please drop a comment it this made your day.

Recommendation

Try my Open Source PHP visitor analytics script CrazyStat.

13. June 2017

Putty: Automatically start an SSH tunnel without a window (headless)

Filed under: Windows — Tags: , , , , , , , — Christopher Kramer @ 21:23

You use Putty to tunnel some port through SSH to a foreign network but manually starting it again and again annoys you and the window gets in the way? Here is your solution. It requires admin rights and is tested on Windows 7 Professional only. Please let us know in the comments whether it works the same in your windows version.

  1. Set up your SSH tunnel in putty and save it as a session (e.g. with the name mytunnel). Make sure to use keys for authentication and that the key does not require a passphrase. Without a window there is no way to enter the passphrase of course ;-). If you worry about security, best restrict the rights of the user that you connect to as much as possible.
  2. Press WINDOWS + R and enter Taskschd.msc to start the Windows Task Scheduler. Accept the UAC prompt, if any.
  3. In the tree on the left, select the folder Task Scheduler Library.
  4. On the right, click Create task…
  5. Enter a name like SSH Tunnel.
  6. Choose Run whether user is logged on or not (this is important to make sure the window does not pop up).
  7. Click the checkbox Do not store the password. The process will only have access to local resources.
  8. Switch to the Triggers tab.
  9. Click the New… button
  10. Select a trigger that suits your needs. I chose Daily,  recur every 1 days, Repeat task every 30 minutes for the duration of 1 day and stop all running tasks at the end of repetition interval.  Click OK. This will restart the SSH tunnel every 30 minutes, so you might be left without connection for at most 30 minutes. You could add another trigger at startup or login if you need that.
  11. Switch to the Actions tab.
  12. Click the New… button.
  13. Choose Start a program as action.
  14. Use the Browse button to find plink.exe, which belongs to putty, you can download it here.
  15. Next to Add arguments, enter the name of your putty session (e.g. mytunnel).
  16. Click OK.
  17. You can adjust more settings like in the Conditions tab, unselect Start the task only if the computer is on AC power to make sure your tunnel also starts when your laptop is operating on battery, if necessary.
  18. Click OK.
  19. Right click your task and select Run to see if it works as expected. No window should come up but your ssh tunnel should be working.

Let me know if this saved your day and what you are using it for. I am using this to create an SSH tunnel for Sophos Endpoint Security and Control to fetch its updates from a server that is only accessible from an internal network.

23. April 2013

Enlarge dynamic and fixed VHD virtual hard drives

Filed under: Windows — Tags: , , , , , , , , — Christopher Kramer @ 23:42

If you use Virtual PC or built-in Windows backup for example, you probably use virtual hard drives stored in vhd-files.

I already blogged once about how you can mount such a vhd file easily in Windows.

But there is one big problem with vhd files: When you create them, you often don’t really know how big the file should be. You can use a dynamic vhd to solve this partly (at the cost of performance), but still you need to give a maximum size.

And then the time will come when you realize your vhd needs to be bigger then you specified it. So here is how you can enlarge vhds – no matter whether they are fix sized or dynamic.

Enlarge vhd file using diskpart

You can enlarge the vhd file in diskpart. Start diskpart, e.g. with [Windows-Key]+[R], type “diskpart” and hit [enter]. UAC will prompt you for permission (say “Yes”). So now select your virtual disk using the following command:

select vdisk file="C:\path\to\vdisk.vhd"

Now enlarge the disk using this command:

expand vdisk maximum=10000

In this example, 10000 means that the new total size of the disk is 10 000 MB (adjust the number to your needs).

So now your virtual hard drive grew larger. But the partition inside still has the old size. So you need to enlarge the partition as well.

Enlarge the partition in the virtual disk using Disk management

The easiest way to do this is to use Windows Disk Management, which is part of Computer Management . The fastest way to get there in Windows 7 is to click the Windows icon and enter “Disk Management” and start the appearing “Windows Disc Management” (Windows UAC will again ask you for permission, say “Yes”). Or, also for other Windows version, [Windows]+[R] and type “diskmgmt.msc” and hit enter.

Open the VHD with “Action” / “Attach VHD”. Choose the file, make sure “readonly” is not checked and click “OK”.

Then you will see the VHD just like your normal drives in the graphical overview. There you will see the partition in blue (or dark green, if it is a logical one) and the empty space in light green. Right-click the partition and choose “Extend Volume”. The tool  will propose to use all the empty space so you can just accept that and that’s it. Finally, right click the VHD drive and select “Detach VHD”. Make sure you don’t select the option to delete the VHD file after detaching!

Enlarge the partition in the virtual disk using diskpart

You can also achieve the same thing in diskpart (i.e. on the console, not using the GUI).

Open diskpart, and mount the VHD using:

select vdisk file="C:\path\to\vdisk.vhd"
attach vdisk

Then do

list volume
select volume=<No of volume>
extend size=100

Instead of <No of volume>, you need to enter the number of the volume (see output of “list volume”).

In this example, the partition gets enlarged by 100 MB. Here you need to specify the relative amount of space that gets added.

Finally, detach the vdisk:

detach vdisk

Problems? Just ask!

I hope this helps somebody. If so, please drop a comment. If you have problems, also just drop a comment.

26. November 2012

CrazyStat: Detect Windows 8

Filed under: CrazyStat,PHP,Windows — Tags: , , , , — Christopher Kramer @ 10:50

To make CrazyStat detect Windows 8, just replace stat/usr/keywords/os.txt with the one I just committed to svn.

Download it here

(If this link does not work, use this one and click “download this file” there.)

Just upload this file to stat/usr/keywords.

26. March 2012

autoNUM turns NUM on when external keyboard is connected

Filed under: Windows — Tags: , , , , , , , , — Christopher Kramer @ 11:41

autoNUM a small tool meant for laptops/notebooks. It turns NUM on automatically when you connect your external keyboard to your notebook. When you disconnect it, it automatically turns NUM back off again.

This is very helpful if you use an external keyboard frequently and love to use NUM when it is plugged in.

The tool has been available for quite a while now, but now an important update has been made. It fixes a bug that made autoNUM not recognize that the keyboard is not connect on startup. This is now fixed. Furthermore, the UI has been slightly improved.

Check out the tool and tell me if you like it.

29. February 2012

Windows: Mount VHD-file (virtual hard disk) via Right-Click

Filed under: Windows — Tags: , , , , , , — Christopher Kramer @ 12:18

You might know .vhd-files from Virtual PC or Windows Backup. In case you need to access a file from such a virtual hard drive, you can easily mount it in Windows.

It is possible via drive manager, but today I found a solution that is even a lot easier: Just right click a vhd-file and select to mount the file via “send to”.

Here is the tutorial including the necessary batch scripts:

How-To Geek: Mount and Unmount a VHD File in Windows Explorer via a Right-Click

Works great on Windows 7 – not tested any other version.