DeutschEnglish

Submenu

 - - - By CrazyStat - - -

13. August 2014

Icinga: Monitor refused mails in postfix mailqueue

Filed under: Linux,Server Administration — Tags: , , , , , , , , , , — Christopher Kramer @ 12:09

In case your server gets listed on blacklists, mails will get refused by destination servers and stick in the deferred mail queue for some time until the sender finally gets a mailer daemon.

As it takes some time until the sender gets the mailer daemon and informs the server admin, it would be better if you could directly get notified by Icinga/Nagios when a mail is in the deferred queue because the destination server refused it.

Therefore I wrote a small shell script which I want to share with you here. I am assuming Debian Wheezy with Icinga and a postfix mailserver.

Create the shell script with the actual plugin in

/usr/lib/nagios/plugins/check_mailq_blacklist :
#!/bin/sh
# detects if mails in mail queue were refused by destination server (because of blacklist?)
# From https://blog.christosoft.de/2014/08/icinga-monitor-refused-mails-postfix-mailqueue/
# Version: 2017-03-07

if mailq | grep -qP "(refused to talk to me(?!(.*out of connection slots)))|(unsolicited mail originating from your IP)|(temporarily deferred due to user complaints)"
then
  mails=`mailq | grep -oP "(refused to talk to me(?!(.*out of connection slots)))|(unsolicited mail originating from your IP)|(temporarily deferred due to user complai$
  echo "$mails mail(s) were refused, check mailq!"
  if [ "$mails" -le 10 ] && [ "$mails" -gt 1 ]; then
    # 2-10 mails -> warning
    echo "\nWarning. | refused=$mails;2;11;0"
    return 1;
  fi
  if [ "$mails" -gt 10 ]; then
    # more than 10 mails -> critical
    echo "\nCriticial! | refused=$mails;2;11;0"
    return 2;
  fi
  return 1;
else
  echo "Ok, there seems to be no refused mail in the mailq | refused=0;2;11;0"
  exit 0;
fi

This will check for the texts “refused to talk to me” (not followed by “out of connection slots”) and “unsolicited mail originating from your IP” in the mailq output. These are the most common errors you get when the destination server has your server’s IP blacklisted.  In case at least one mail was refused, this causes a warning state in icinga. If more than 10 mails were refused, it causes a critical state.

Now you need to make this script executable:

chmod +x /usr/lib/nagios/plugins/check_mailq_blacklist

Now create the config file for the plugin in

/etc/nagios-plugins/config/mailq_blacklist.cfg :
# 'check_mailq_blacklist' command definition
define command{
        command_name    check_mailq_blacklist
        command_line    /usr/lib/nagios/plugins/check_mailq_blacklist
}

So now we have the command and need to define a service that uses it. Let’s say we use this locally for localhost. In

/etc/icinga/objects/localhost_icinga.cfg

add:

define service{
        use                             generic-service
        host_name                       localhost
        service_description             Mail Queue Refused Mail
        check_command                   check_mailq_blacklist
        }

This is it, just restart icinga and you are done:

service icinga restart

I hope this is of use to somebody.

Of course it is also useful to monitor in Icinga, if you are on some of the most used blacklists. A script to do this can be found here.

Recommendation

Try my Open Source PHP visitor analytics script CrazyStat.

27. May 2014

Debian Linux: Update packages automatically

Filed under: Linux,Server Administration — Tags: , , , , , — Christopher Kramer @ 20:50

Here is how you configure automatic (security) updates on Debian:

aptitude install unattended-upgrades

Here you can configure it:

nano /etc/apt/apt.conf.d/50unattended-upgrades

This could look like this:

Unattended-Upgrade::Origins-Pattern {
        "origin=Debian,archive=stable,label=Debian-Security";
};
Unattended-Upgrade::Package-Blacklist {
// add packages here that need manual steps like this:
//        "vim";
}
Unattended-Upgrade::AutoFixInterruptedDpkg "true";
Unattended-Upgrade::MinimalSteps "true";
Unattended-Upgrade::InstallOnShutdown "false";
Unattended-Upgrade::Mail "root";
Unattended-Upgrade::MailOnlyOnError "true";
Unattended-Upgrade::Remove-Unused-Dependencies "true";
Unattended-Upgrade::Automatic-Reboot "false";
Acquire::http::Dl-Limit "200";

Now create the following file:

nano /etc/apt/apt.conf.d/02periodic

With this content:

// Enable the update/upgrade script (0=disable)
APT::Periodic::Enable "1";

// Do "apt-get update" automatically every n-days (0=disable)
APT::Periodic::Update-Package-Lists "1";

// Do "apt-get upgrade --download-only" every n-days (0=disable)
APT::Periodic::Download-Upgradeable-Packages "1";

// Run the "unattended-upgrade" security upgrade script
// every n-days (0=disabled)
// Requires the package "unattended-upgrades" and will write
// a log in /var/log/unattended-upgrades
APT::Periodic::Unattended-Upgrade "1";

// Do "apt-get autoclean" every n-days (0=disable)
APT::Periodic::AutocleanInterval "7";

Of course the server needs to be able to send mails so it can send mails in case of problems.

You can test it like this:

# mail -s test mail@example.com
My testmail
.
EOT

Hope this helps somebody.

Update: Some updates caused dpkg questions about changed config files and therefore failed.

For example php5-fpm did ask this:

Setting up php5-fpm (5.4.4-14+deb7u10) ...

Configuration file `/etc/php5/fpm/pool.d/www.conf'
 ==> Deleted (by you or by a script) since installation.
 ==> Package distributor has shipped an updated version.
   What would you like to do about it ?  Your options are:
    Y or I  : install the package maintainer's version
    N or O  : keep your currently-installed version
      D     : show the differences between the versions
      Z     : start a shell to examine the situation
 The default action is to keep your current version.
*** www.conf (Y/I/N/O/D/Z) [default=N] ? dpkg: error processing php5-fpm (--configure):
 EOF on stdin at conffile prompt

This caused PHP5-FPM to stop and all PHP sites to show an Internal Server Errror…

So you don’t run into this problem, create /etc/apt/apt.conf.d/local with this content:

Dpkg::Options {
   "--force-confdef";
   "--force-confold";
}

This tells DPKG to keep the old config file. It will create .dpkg-dist files with the package distributer’s version. More information on this can be found here.

10. April 2014

Inkscape: Change Arrowhead color

Filed under: Linux,Uncategorized,Windows — Tags: , , , , , — Christopher Kramer @ 18:55

In Inkscape, a great open source vector graphics program, when you change the stroke color of a path, the arrow heads still remain black. But there is a way to change their color, although quite unintuitive.

This is how it looks like:

Inkscape: arrows with same arrowhead color as the path

Inkscape: arrows can have the same arrowhead color as the path

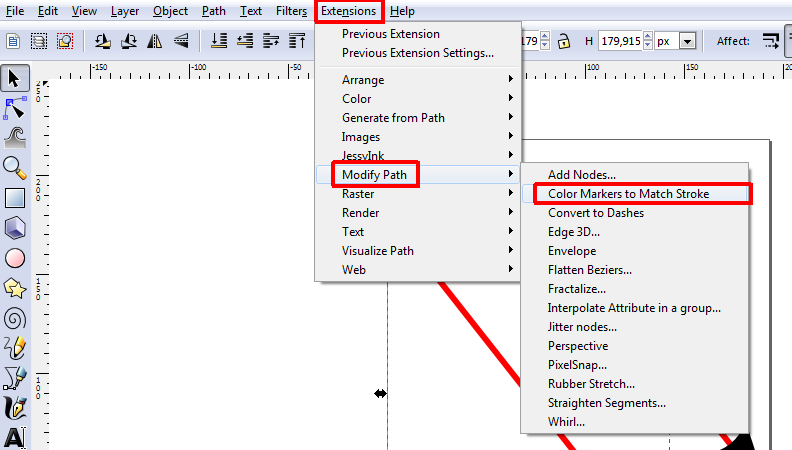
And this is how its done:

  1. Mark the Path you want to change the color of the arrowhead
  2. “Extensions”
  3. “Modify Path”
  4. “Color Markers to Match Stroke”

That’s it!

inkscape_arrows_color

Update: Inkscape 0.91

In Inkscape 0.91, this problem is “fixed”: The arrowhead automatically gets the Stroke-color assigned and the extension mentioned above is gone. But:

Sometimes when I change the stroke color, the arrowhead does not get updated. In this case, you can adjust the arrowhead color like this:

Select the arrow, double click the color next to “Stroke:” on the lower left of the screen, it opens the window to adjust the stroke color and without doing anything in this window, it magically adjusts the color of the arrowhead.

Update: Inkscape 0.92

Unfortunately, I still have issues with the arrowhead color in Inkscape 0.92 and the workarounds above do not seem to work anymore. However, these problems only occur in old documents that I try to edit. In new documents, the arrowhead color works as expected. My current workaround is to create a new document, create the arrow I want there and then copy it into the old document. This way, I get arrows where I can edit the arrowhead color by editing the stroke color as expected.

18. January 2014

Linux: get members of a group / get groups of a user

Filed under: Linux,Server Administration — Tags: , , , , — Christopher Kramer @ 00:23

This might sound easy with /etc/group and /etc/passwd, but what if you use libnss-mysql for example and need to try if it works?

So just forget grepping config files. Here are the real commands:

Members of a group:

getent group GROUPNAME

Replace GROUPNAME with the group you want to check.

Groups of a user:

groups USERNAME

Replace USERNAME with the name of the user to check.


Checked on Debian, not sure if it works on any Linux/Unix.

1. September 2013

MySQL: reset a forgotten MySQL root password

Filed under: DBMS,Linux,Security,Server Administration — Christopher Kramer @ 14:37

Just in case you don’t know the password of your MySQL root user anylonger, this is how you can set a new one.

Windows users, follow this guide.

Linux / Unix users: This is for Debian (wheezy) and MySQL 5.5, but should work more or less the same on any linux/unix:

Either do this as (linux user) root or prefix every command with sudo:

  1. Stop the MySQL server
    service mysql stop
  2. Create a init file:
    touch /etc/mysql/mysql-init
  3. Write the following into this file (adjust the PW):
    SET PASSWORD FOR 'root'@'localhost' = PASSWORD('MyNewPassword');
  4. Restart MySQL with this init-file:
    mysqld_safe --init-file=/etc/mysql/mysql-init
  5. The new password should work now. Try it:
    mysql -u root -p
  6. Restart MySQL normally:
    service mysql restart
  7. Remove the init-file
    rm /etc/mysql/mysql-init

And you’re done. I hope this helps somebody.

Note: if it does not work, it is most likely because the MySQL process cannot access the init-file (e.g. because of missing access rights). In this case check your (sys)logs for stuff like this:

mysqld: 130901 14:20:30 [ERROR] /usr/sbin/mysqld: File '/root/mysql-init' not found (Errcode: 13)

I had this problem first because I tried creating the init-file in /root where the mysql-process was not able to read it.

11. August 2013

RT Request Tracker: Migrate From SQlite to mySQL

Filed under: DBMS,Linux,Server Administration — Tags: , , , , , , — Christopher Kramer @ 23:07

I lately had to migrate an RT installation (version 4.0.4) from SQLite to MySQL. In case anyone else has to do this, here is a brief description of how it worked out.

  1. Setup a working MySQL server in case you have not already
  2. Create a MySQL user for RT (e.g. rt4)
  3. Configure RT to use MySQL using this username and a dbname (e.g. rt4) of a not yet existing db (See /etc/request-tracker4/RT_SiteConfig.pm and RT_SiteConfig.d/)
    I’d recommend to keep a copy of the SQlite-Config…
  4. Run
    rt-setup-database --action init

    to create a blank RT DB in MySQL. Check if it worked.

  5. Delete all rows from the MySQL DB, only keep the schema.
  6. Create a copy of your SQLite db
    cp rtdb mydbcopy
  7. Open the copy of the db in the sqlite shell
    sqlite3 mydbcopy
  8. For each table in the DB:
    1. Set the Output file to something like this (“Attachments” is the table name)

    .out data_Attachments

    2. Set the mode to insert (“Attachments” is again the table name)

    .mode insert Attachments

    3. Get all the data

    SELECT * FROM Attachments;

    4. Now you have a file with lots of INSERT statements for the Attachments table. Try to run it in mysql:

    mysql -u rt4 -p rt4 < data_Attachments

    (On a linux shell, not the sqlite shell of course. Here the first rt4 is the username and the second the dbname. data_Attachments is the dump file created before)
    5. In case mysql complains some NOT NULL constraints are violated:
    Go back to the sqlite shell and set these cells to the default-value (0):

    UPDATE Attachments SET someColumn=0 WHERE someColumn IS NULL;

    (Only do this on the copy, not the original db 😉 )
    Now recreate the dump and retry to insert this in mysql. Do it with all columns where NOT NULL constraints are violated.

This works table by table, there are no foreign keys that would get in the way. You can also do several tables in one output file, but you might run into problems when NOT NULL constraints are violated by one table. After all your tables are filled with your data, RT should work. Maybe restart Apache.

apache2ctl restart

This worked without problems so far for me. I first tried pumping the whole SQLite dump into MySQL (using this conversion script) but the schema that this ended up in was different, missed indexes and RT only liked it until I restarted Apache (which then refused to start). Better start with a schema created by rt-setup-database, not with one that originates from SQLite.

I hope this is of some help for somebody. Please let me know in case it helped you or if you have any comments or questions.

21. March 2013

Linux: ACPI disabled, won’t shut down, /sys/class/rtc/rtc0/wakealarm vanished

Filed under: Linux — Tags: , , , , , , , , , , , — Christopher Kramer @ 00:16

MythTV server won’t shut down automatically any longer

Today my mythTV based media homeserver suddenly would not automatically shutdown any longer after a kernel update.

Logs by mythbackend (/var/log/mythtv/mythbackend ) that triggers the shutdown  looked like this:

localhost mythbackend[1674]: I Scheduler scheduler.cpp:2729 (CheckShutdownServer) CheckShutdownServer returned - OK to shutdown
localhost mythbackend[1674]: N Scheduler scheduler.cpp:2814 (ShutdownServer) Running the command to set the next scheduled wakeup time [...]
localhost mythbackend[1674]: E Scheduler scheduler.cpp:2820 (ShutdownServer) SetWakeuptimeCommand failed, shutdown aborted

Problem: /sys/class/rtc/rtc0/wakealarm vanished after kernel update

So I ran the SetWakeupTime command myself and go this problem:

/sys/class/rtc/rtc0/wakealarm: No such file or directory

And in fact the file was missing.

System won’t power off any longer

I tried to shut down the pc completely (manually) and start it again. But it wouldn’t power off, it just freezed with the shutdown bar on the screen. Pressing the power button once (only short, not holding it) made the PC power off.

So this looked like some big ACPI problem.

ACPI disabled

After some more search, I found this in the syslog (/var/log/syslog):

localhost kernel: [    0.000000] ACPI: no DMI BIOS year, acpi=force is required to enable ACPI
localhost kernel: [    0.000000] ACPI: Disabling ACPI support

So no ACPI support explains why wakealarm and shutdown is broken.

I am wondering why this happens suddenly after a kernel update (I have not changed my BIOS or something and ACPI was perfectly working before).

Solution: force ACPI

Forcing ACPI solved the problem.

If you use grub2, this is how to do it:

Open /etc/default/grub (e.g. “sudo nano /etc/default/grub”) and update this line:

GRUB_CMDLINE_LINUX_DEFAULT="quiet splash"

Into this:

GRUB_CMDLINE_LINUX_DEFAULT="quiet splash acpi=force"

Save the file and update the grub configuration:

sudo update-grub

Then restart and you’ll be done.

sudo shutdown -r now

I hope this could help somebody.

7. February 2013

Icinga / Nagios: Notify a group of contacts about a group of hosts

In Nagios/Icinga, you can easily define which contacts or contact groups get notified for a certain service in the service definition:

 define service{
        host_name               linux-server
        service_description     check-disk-sda1
        check_command           check-disk!/dev/sda1
        max_check_attempts      5
        check_interval          5
        retry_interval          3
        check_period            24x7
        notification_interval   30
        notification_period     24x7
        notification_options    w,c,r
        contact_groups          linux-admins
        }

(Source of this example: Icinga documentation)

So only contacts of the contact group “linux-admins” would be informed about problems regarding this service.

You could also use the “contacts” directive to list individual contacts or list multiple contact groups.

But often, the responsibility of admins is not defined through services, but through hosts. Usually, there is a group of admins for linux servers and one for windows servers. Or a group for intranet servers and one for internet servers. As admins usually are annoyed if they get notifications about servers they are not responsible for, it is usually a good idea to only notify those admins that are responsible.

So you can also do this at the host-definition:

 define host{
        host_name                       bogus-router
        alias                           Bogus Router #1
        address                         192.168.1.254
        parents                         server-backbone
        check_command                   check-host-alive
        check_interval                  5
        retry_interval                  1
        max_check_attempts              5
        check_period                    24x7
        process_perf_data               0
        retain_nonstatus_information    0
        contact_groups                  router-admins
        notification_interval           30
        notification_period             24x7
        notification_options            d,u,r
        }

(Source of example: icinga documentation)

So only the contact_group “router_admins” would be notified for this host.

But one thing where the “contacts” and “contact_groups” directive is missing, is the hostgroups definition. It is not possible to directly assign a contact group  or list of contacts to a hostgroup or the other way round. So here is how it can be done with another type of definition.

Group your hosts

First, define a group of hosts for each group of admins. So for example, group all intranet servers in one and all internet servers in another group. You probably already did this.

define hostgroup{
        hostgroup_name          intranet-servers
        alias                   Intranet Servers
        members                 intra1, intra2, intra3
}
define hostgroup{
        hostgroup_name          internet-servers
        alias                   Internet Servers
        members                 inter1, inter2, inter3
}

See the icinga documentation for details. Note to use the shortnames in “members”.

You can also define things the other way round: When defining a host, say which hostgroup it belongs to:

define host{
        use                     generic-host
        host_name               intra1
        alias                   intra1.local
        address                 192.168.10.1
        hostgroups              intranet-servers
        }

See documentation for details.

Group your contacts

Next, group your contacts. So create a contact-group for each group of admins so we can later assign this contact group to the corresponding group of hosts.

Example:

define contactgroup{
        contactgroup_name       intranet-admins
        alias                   Intranet Administrators
        members                 alice, bob
        }
define contactgroup{
        contactgroup_name       internet-admins
        alias                   Internet Administrators
        members                 charley
        }

See documentation. Again, you can also define it the other way round (list the contact groups at the contact-definition).

Assign contact groups to host groups

Now comes the interesting part. To do this, we use a “Hostescalation definition“.

Example:

 define hostescalation{
        hostgroup_name          intranet-servers
        first_notification      1
        last_notification       0
        notification_interval   60
        contact_groups          intranet-admins
        }

 define hostescalation{
        hostgroup_name          internet-servers
        first_notification      1
        last_notification       0
        notification_interval   60
        contact_groups          internet-admins
        }

This will make sure internet-admins get informed about internet-servers and intranet-admins about intranet-servers. “last-notification 0” means that all notifications will get sent to this group of contacts. You can adjust the notification_interval (in minutes) if you want.

The cool thing here is that you can also define that if the problem still occurs after 5 notifications, the other team of admins gets notified:

define hostescalation{
        hostgroup_name          intranet-servers
        first_notification      1
        last_notification       3
        notification_interval   30
        contact_groups          intranet-admins
        }
define hostescalation{
        hostgroup_name          intranet-servers
        first_notification      4
        last_notification       0
        notification_interval   60
        contact_groups          internet-admins, intranet-admins
        }

This would notify “intranet-admins” 3 times (every 30 minutes) about problems with “intranet-servers”. If the problem is still not solved, “internet-admins” will get notified as well. So the internet-admins won’t get bothered with short problems that the intranet-admins can fix, but will still get informed if the problem is not solved for some time.

More information on hostescalation and serviceescalation in the documentation here, here and here.

I hope this helped somebody.

30. January 2013

Nagios / Icinga: Monitor (local) memory usage

Filed under: Linux,Server Administration — Tags: , , , , , , , , , , , , , — Christopher Kramer @ 17:55

Nagios and its fork icinga are great monitoring tools. They come with a bundle of plugins to monitor standard services such as HTTP, SMTP, POP3, load and stuff like that. And there are lots of 3rd party plugins available for almost everything else you can think of.

But one standard thing that is missing in the official nagios-plugins package is a plugin to check memory usage (of the local machine).

So here is how to install one. I assume a Debian system with Icinga running – you might want to adjust paths for other distros or nagios.

  1. Download the plugin here
    e.g. from the shell:

    wget https://exchange.icinga.com/exchange/check_memory/files/784/check_memory.pl
  2. Then move the file to the other plugins
    mv check_memory.pl /usr/lib/nagios/plugins/check_memory.pl
  3. Make it executable
    chmod +x /usr/lib/nagios/plugins/check_memory.pl
  4. Try to run it:
    perl /usr/lib/nagios/plugins/check_memory.pl -w 50% -c 25%
  5. This should give something like “CHECK_MEMORY OK – […] free […]”. If an error occurs, you probably need to install the perl module Nagios::Plugin. On Debian, the easiest way is:
    apt-get install libnagios-plugin-perl

    On other distros, you might use CPAN:

    perl -MCPAN -e 'install Nagios::Plugin'

    This will ask you lots of questions and install lots of dependencies (where you should say “yes”).

  6. Configure the check_memory command. To do this, create a file /etc/nagios-plugins/config/memory.cfg with this content:
    # 'check_memory' command definition
    define command{
            command_name    check_memory
            command_line    perl /usr/lib/nagios/plugins/check_memory.pl -w $ARG1$ -c $ARG2$
            }
  7. Now you can use the check_memory command to define a service. For example, add this to /etc/icinga/objects/localhost_icinga.cfg (assuming you define localhost-services there):
    define service{
            use                             generic-service
            host_name                       localhost
            service_description             Memory
            check_command                   check_memory!50%!25%
            }

    This will send you a warning when memory usage is 50% and critical when only 25% is free. You might want to adjust these values of course depending on what is normal on your system and how early you want to be notified.

  8. Check your configuration:
    /usr/local/icinga/bin/icinga -v /etc/icinga/icinga.cfg
  9. Restart Icinga / Nagios if the preflight-check was okay:
    /etc/init.d/icinga restart

This should be it.

I hope this helped somebody.

To monitor memory usage of a remote server, you’ll need SNMP for example. Maybe I’ll post another blog post on this soon.

6. October 2012

Raspberry Pi as a digital webradio

Filed under: Linux,Raspberry Pi — Tags: , , , , , , , — Christopher Kramer @ 19:41

As my FM radio just sounded painfully because of so much noise, I looked at my Raspberry Pi lying next to it and thought “would it work as a digital webradio?”.

So I went ahead and installed VLC player:

apt-get install vlc

Then I went to the website of the local radio station and downloaded the m3u-file to the 128 kbit/s MP3-stream. Then I opened the file in VLC and clicked Play.

And it works great! CPU usage is at about 40%, RAM at 70MB. Sound can be digitally transferred using HDMI or using the stereo jack.

By the way, you can change the audio output to the stereo jack like this:

sudo amixer cset numid=3 1

And to HDMI:

sudo amixer cset numid=3 2

Compared to normal standalone webradios, this is not even an expensive solution. Using the IO pins, one could add buttons to control it, add an IR receiver via USB to add an IR remote control. You could even control it over the web using your smartphone.

Power consumption of the raspberry pi is also okay for a webradio, even if you do not shut it down because booting takes too long. Maybe the XBMC distribution for the raspberry pi is even better for a usage like this.

Oh, there are so many cool usages for this board. I really need to build something cool out of it.

« Newer PostsOlder Posts »