DeutschEnglish

Submenu

 - - - By CrazyStat - - -

26. March 2017

Zimbra: fix corrupt index open_conversation in an mboxgroup MySQL-DB

Filed under: DBMS,Linux,Server Administration — Tags: , , , , , , — Christopher Kramer @ 20:50

Just wanted to upgrade a Zimbra server from 8.7.3 to 8.7.5. The upgrade always asks you whether to check database integrity. Even it was only a minor upgrade, I chose yes to be on the safe side. And it turned out the MySQL DB was indeed corrupt.

I had seen corrupt zimbra dbs a lot and the “MySQL crash recovery” guide in the zimbra wiki always helped out. But not this time.

I tried the crash recovery as explained in the wiki. When doing dumps, four mboxgroup-databases always failed because the index open_conversation of the table open_conversation was corrupt. As the guide explains, I increased innodb_force_recovery step by step from 1 to the maximum 6, but the error did not go away.

So here is what helped:

  1. Try to create the dumps as explained in the crash recovery guide. You will get errors like this:
    Dumped mboxgroup8
    mysqldump: Error 1712: Index open_conversation is corrupted when dumping table `open_conversation` at row: 0
    Dumped mboxgroup9

    This means that mboxgroup9 (not 8!) is corrupt. Write down all the mboxgroup numbers where an error appeared.

  2. Remove  innodb_force_recovery from the my.cnf if you inserted it
  3. Login as zimbra
    su zimbra
  4. Restart the mysql server
    mysql.server restart
  5. Load the MySQL account data into shell variables
    source ~/bin/zmshutil ; zmsetvars
  6. Log into MySQL using the root account
    mysql -u root --password=$mysql_root_password
  7. Open the first database that is corrupt:
    USE mboxgroup9;
  8. Repair the corrupt open_converstation table:
    OPTIMIZE TABLE open_conversation;

    Note: If this fails, check if you really removed innodb_force_recovery from the my.cnf!

  9. Go back to step 7 and open the next database that is corrupt until all have been repaired.
    Now exit the MySQL prompt:

    exit;
  10. You can now continue with the crash recovery, it should now create all dumps correctly. But if the open_conversation tables where the only corruption problem, you could also just stop here as this should have fixed the corruption. In my case, I jus started the upgrade again and let it verify message store database integrity again, and this time it completed with “No errors found”. 🙂
  11. Clean up the MySQL dumps
     rm -R /tmp/mysql.db.list /tmp/mysql.sql/

Please let me know if this helped you or if you have some additions.
Recommendation

Try my Open Source PHP visitor analytics script CrazyStat.

19. May 2016

Ubuntu Gnome: Upgrading to 16.04 Xenial Xerus fails: ubuntu-gnome-desktop (gdm, gnome-session, adwaita-icon-theme and adwaita-icon-theme-full)

Filed under: Linux — Tags: , , , , , , , — Christopher Kramer @ 13:26

Today I upgraded my Ubuntu Gnome 15.10 to 16.04 Xenial Xerus. I was surprised to find in the details that it removes gdm. I started the update and it went normal until it said ubuntu-gnome-desktop was broken due to unresolved dependencies. The GUI upgrade process that I had used closed and I was left with a system upgraded by half. But it was still running, so I started a terminal and started aptitude. It suggested to install various packages to resolve dependencies, especially gdm3, gnome-shell, gnome-shell-extensions and gnome-session. It also proposed to remove unused packages, which were not removed as the upgrade process had stopped half way. I followed aptitudes suggestions, but it left two packages not upgraded: adwaita-icon-theme and gnome-session.

And this took me quite a while to solve. There are two packages: adwaita-icon-theme and adwaita-icon-theme-full. The first one contains a subset of icons, whereas the second one contains all icons. The ubuntu-gnome-desktop requires the adwaita-icon-theme-full package, which in turn requires the adwaita-icon-theme package. The adwaita-icon-theme had an upgrade from version 3.18.0-2ubuntu3 to 3.18.0-2ubuntu3.1. The adwaita-icon-theme-full package requires that it is exactly the same version as adwaita-icon-theme, but the only version that apt found was 3.18.0-2ubuntu3.

Then I found out that adwaita-icon-theme-full is in the universe repository, whereas adwaita-icon-theme is in main. In my sources.list, I had the following:

deb http://de.archive.ubuntu.com/ubuntu/ xenial-proposed main restricted

Therefore, the new version of adwaita-icon-theme was found in the main repository. But universe (and multiverse) repositories were missing  the proposed level, and this was the reason why the new version of adwaita-icon-theme-full was not found by apt. So the solution was simple: Just changing the above lines in sources.list like this, adding universe and multiverse repositories:

deb http://de.archive.ubuntu.com/ubuntu/ xenial-proposed main restricted universe multiverse

Then it updated the remaining packages normally using:

aptitude update
aptitude safe-upgrade

So lesson learned is:
If you add the proposed level in your sources.list, make sure you add it for all repositories you use, e.g. including universe and multiverse, not only main.

Hope this helps somebody who runs into the same issue.

5. June 2015

Ubuntu gnome: minimize buttons missing after upgrade to vivid

Filed under: Linux — Tags: , , , , , , , — Christopher Kramer @ 15:22

After upgrading an Ubuntu Gnome installation from 14.10 utopic to 15.04 vivid, the minimize and maximize buttons at the windows were missing.

This is how I got them back:

Run

dconf-editor

Then go to

org → gnome → desktop → wm → preferences

And change the value for “button-layout” from

appmenu:close

to:

appmenu:minimize,maximize,close

And close the window. That’s it 🙂

27. May 2014

Debian Linux: Update packages automatically

Filed under: Linux,Server Administration — Tags: , , , , , — Christopher Kramer @ 20:50

Here is how you configure automatic (security) updates on Debian:

aptitude install unattended-upgrades

Here you can configure it:

nano /etc/apt/apt.conf.d/50unattended-upgrades

This could look like this:

Unattended-Upgrade::Origins-Pattern {
        "origin=Debian,archive=stable,label=Debian-Security";
};
Unattended-Upgrade::Package-Blacklist {
// add packages here that need manual steps like this:
//        "vim";
}
Unattended-Upgrade::AutoFixInterruptedDpkg "true";
Unattended-Upgrade::MinimalSteps "true";
Unattended-Upgrade::InstallOnShutdown "false";
Unattended-Upgrade::Mail "root";
Unattended-Upgrade::MailOnlyOnError "true";
Unattended-Upgrade::Remove-Unused-Dependencies "true";
Unattended-Upgrade::Automatic-Reboot "false";
Acquire::http::Dl-Limit "200";

Now create the following file:

nano /etc/apt/apt.conf.d/02periodic

With this content:

// Enable the update/upgrade script (0=disable)
APT::Periodic::Enable "1";

// Do "apt-get update" automatically every n-days (0=disable)
APT::Periodic::Update-Package-Lists "1";

// Do "apt-get upgrade --download-only" every n-days (0=disable)
APT::Periodic::Download-Upgradeable-Packages "1";

// Run the "unattended-upgrade" security upgrade script
// every n-days (0=disabled)
// Requires the package "unattended-upgrades" and will write
// a log in /var/log/unattended-upgrades
APT::Periodic::Unattended-Upgrade "1";

// Do "apt-get autoclean" every n-days (0=disable)
APT::Periodic::AutocleanInterval "7";

Of course the server needs to be able to send mails so it can send mails in case of problems.

You can test it like this:

# mail -s test mail@example.com
My testmail
.
EOT

Hope this helps somebody.

Update: Some updates caused dpkg questions about changed config files and therefore failed.

For example php5-fpm did ask this:

Setting up php5-fpm (5.4.4-14+deb7u10) ...

Configuration file `/etc/php5/fpm/pool.d/www.conf'
 ==> Deleted (by you or by a script) since installation.
 ==> Package distributor has shipped an updated version.
   What would you like to do about it ?  Your options are:
    Y or I  : install the package maintainer's version
    N or O  : keep your currently-installed version
      D     : show the differences between the versions
      Z     : start a shell to examine the situation
 The default action is to keep your current version.
*** www.conf (Y/I/N/O/D/Z) [default=N] ? dpkg: error processing php5-fpm (--configure):
 EOF on stdin at conffile prompt

This caused PHP5-FPM to stop and all PHP sites to show an Internal Server Errror…

So you don’t run into this problem, create /etc/apt/apt.conf.d/local with this content:

Dpkg::Options {
   "--force-confdef";
   "--force-confold";
}

This tells DPKG to keep the old config file. It will create .dpkg-dist files with the package distributer’s version. More information on this can be found here.

9. May 2014

Updating to PHP 5.4 causes missing Text

Filed under: PHP,Server Administration — Tags: , , , , , , — Christopher Kramer @ 14:29

After updating from PHP5.3 to PHP 5.4, on some sites text was missing. No error could be found in the error log so I had to dig into the code to find out what was going on.

The root cause is that with PHP5.4, the default character set expected by htmlentites(), htmlspecialcharacters() and html_entity_decode() changed from ISO-8859-1 to UTF-8. So if a script passes ISO-8859-1 characters like German “Umlaute” (öäüÖÄÜß) to one of these functions without specifying the charset with the corresponding parameter, these functions will return an empty string. And unfortunately, with PHP 5.4, they also removed the error message that PHP 5.3 recorded in the logfile in this case. This makes finding the problem a lot more difficult.

So what can you do about it? You could

  1. Use PHP 5.3 😉
    Here is a blog post on downgrading to PHP 5.3. on Debian Wheezy
  2. change the used charset to UTF-8
    This might require changing the character set in files, databases or config files, depending on what is used on the site.
    I explained in a blog post how to change the charset in Typo3 to UTF-8 back in 2012.
  3. Provide ISO-8859-1 as a parameter to all calls of htmlspecialcharacters() etc.

So for the third option, what you have to do is find places like this:

htmlspecialchars($string);

And replace them with something like:

htmlspecialchars($string, ENT_COMPAT | ENT_XHML, 'ISO-8859-1');

The problem is that it’s hard to do this automatically. What is easy to do, is replace all htmlspecialchars()-calls with calls to htmlspecialchars_PHP5-3() etc. and place these functions there:

function htmlspecialchars_PHP5-3($string, $ent=ENT_COMPAT, $charset='ISO-8859-1') {
    return htmlspecialchars($string, $ent, $charset);
}

function htmlentities_PHP-5-3($string, $ent=ENT_COMPAT, $charset='ISO-8859-1') {
    return htmlentities($string, $ent, $charset);
}

function html_entity_decode_PHP-5-3($string, $ent=ENT_COMPAT, $charset='ISO-8859-1') {
    return html_entity_decode($string, $ent, $charset);
}

So just do a search & replace over all files and make sure that all scripts have a file included that contains these functions.

13. March 2013

TortoiseSVN: after stopping merge, workspace is “locked”

Filed under: Windows — Tags: , , , , , , , , — Christopher Kramer @ 20:43

TortoiseSVN is a great Windows Application to access (and even create) SVN repositories. It integrates perfectly into Windows Explorer and has very good merge and diff tools. In my opinion it’s simply the best Windows SVN client available. If you don’t use it already, you should give it a try.

Problem: Working Copy locked after Merge failed

When I tried to apply a patch using TortoiseSVN, I noticed I wanted to apply another patch instead and therefore closed the merge program before it was started completely.

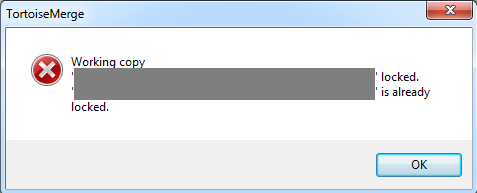
After this, I was not able to apply the other patch. TortoiseMerge said the workspace was locked:

TortoiseMerge: Workspace locked

TortoiseMerge: “Workspace copy is already locked”

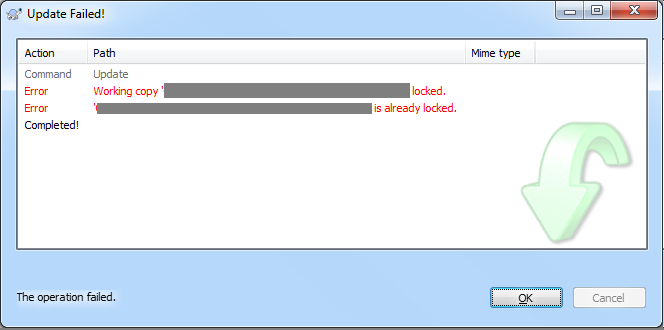
It was also not possible to update the workspace:

Update: Workspace locked

Update: Working Copy is locked

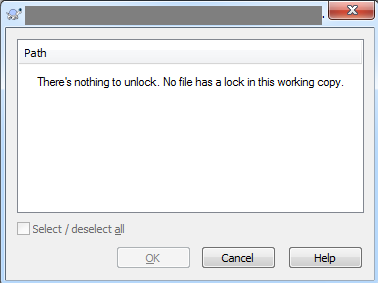
So I tried to unlock it, which is not possible:

TortoiseSVN: "Nothing locked"

TortoiseSVN: “There is nothing  to unlock”

So this is pretty strange. Here is how to solve it:

Solution: Clean up working copy status

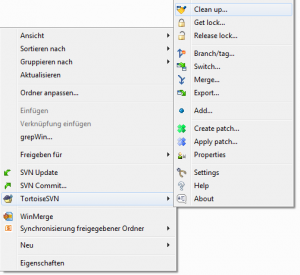
Right-click on the directory and choose “TortoiseSVN”/”Clean Up”.

TortoiseSVN: Clean up

TortoiseSVN: Clean up

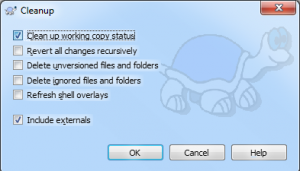
Then only choose “Clean up working copy status”:

TortoiseSVN.:Clean up working copy status

TortoiseSVN.:Clean up working copy status

Click “OK” and that’s it. You can now again update or apply patches without any problems.

I hope this helps somebody to solve his problem a little faster.

15. January 2013

phpLiteAdmin 1.9.3.3 released fixing an XSS vulnerability

Filed under: PHP,phpLiteAdmin,Security — Tags: , , , , , , — Christopher Kramer @ 11:53

It seems currently people have a very close look at security of phpLiteAdmin. This is really good. We immediately fix any security issue we get aware of. Therefore, we yesterday released another security patch with version 1.9.3.3. The security issue fixed in this version is an XSS vulnerability. The risk of this particular issue is considered medium. All users of phpLiteAdmin < 1.9.3.3 are advised to update to the new version. Users of the development version of 1.9.4 should please update to the latest revision from svn, at least revision 317 (2013-01-14).

We are really sorry for those users who needed to update phpLiteAdmin three times in the last days. But the only way to solve security issues is to patch, just ignoring them will not help.

Thanks a lot to Urd for making us aware of this issue. If anybody thinks he found a security issue, please do as Urd did and contact us.

To update phpLiteAdmin, just download the new version, adjust the configuration and replace the phpliteadmin.php with the new one.

Christopher Kramer,

member of the phpLiteAdmin team

9. September 2012

Zimbra: Creating a new self-signed SSL certificate

Filed under: Linux,Server Administration — Tags: , , , , , , , , , — Christopher Kramer @ 10:04

I recently had to recreate the SSL certificate of a Zimbra server and surprisingly it was not as easy as the documentation looked like, so I’d like to document how it is done and make comments on some difficulties that might come up.

So this is how it is done (on a Ubuntu Server running Zimbra Network edition 6.0.16 GA):

  1. SSH into the server, login as root
  2. Switch to the zimbra-user using
    su - zimbra
  3. Then run the following commands:
     sudo /opt/zimbra/bin/zmcertmgr createca -new
     sudo /opt/zimbra/bin/zmcertmgr deployca
     sudo /opt/zimbra/bin/zmcertmgr deploycrt self
  4. Restart Zimbra. To do so, as user zimbra, issue these commands (no sudo here):
    /opt/zimbra/bin/zmcontrol stop
    /opt/zimbra/bin/zmcontrol start

So the difficulties I had and some remarks:

  • sudo kept asking me for a password when I typed in
    sudo zmcertmgr createca -new

    Seems I am not the only one with this problem. The zmcertmgr command is white-listed in /etc/sudoers so you should normally not be asked for a password. Run the following command to edit /etc/sudoers (do not edit it in any other way!)

    visudo

    So make sure in this file the following line is included:

    %zimbra ALL=NOPASSWD:/opt/zimbra/bin/zmcertmgr

    The % at the beginning seems to belong there. Note that the zimbra wiki has typo (zmvertmgr) in this line.
    But although I had this line in there, sudo kept asking me for the password. So what finally worked was invoking zmcertmgr with the complete path (as done above).
    Update: It seems I had a typo in here myself. Make sure it is “zmcertmgr”  and not “zmzertmgr” 😉
    Thanks to the comment by erolha!

  • In the Zimbra Release notes, the last command for updating the certificate is
    sudo zmcertmgr deploycrt self -new

    I got this error:

    Can't deploy cert for -new.  Unknown service.

    Without -new (and the complete path), it went through well.

  • No zimbra documentation I found mentions that a restart of zimbra is required, but without a restart, the old certificate was still used when opening the webmailer or the admin interface via https.


I hope I could help some of you that run into one of these problems.

9. June 2012

Typo3 and other charsets than UTF-8 (latin1 / ISO-8859-1, …)

Filed under: PHP,Server Administration,Typo3 — Tags: , , , , , , , — Christopher Kramer @ 12:30

When updating a Typo3 installation to Typo3 4.5.x, I had problems with charsets and explained the solution here.

Now updating an installation of Typo3 to 4.6.x, I ran into another charset problem: The backend now was completely UTF-8 and therefore, changing texts in the backend caused them to be stored as UTF-8. As the frontend was still ISO-8859-1, special characters (Umlaute) over there got messed up. Maybe there is a way out of this as well ($TYPO3_CONF_VARS['BE']['forceCharset'] I guess), but this clearly shows that Typo3-developers drop support for other charsets slowly and that it might be easier to switch to UTF-8.

In the release notes of Typo3 4.5, I found the following passage:

UTF8 by default: New installations will use UTF8 automatically. Keep in mind that we will be deprecating all other charsets in the release of 4.5, but still support those charsets. 4.7 or maybe even 4.6 will be the first “UTF-8 only” release. When upgrading from older releases to 4.5, you will have to specifically set $TYPO3_CONF_VARS['BE']['forceCharset'] and $TYPO3_CONF_VARS['BE']['setDBinit'] in your localconf.php. An Upgrade Wizard will help you with that.

In the release notes of Typo3 4.6, I could not find a word about UTF-8, but in the release notes of 4.7, it is clearly stated:

check you database if it is utf-8 encoded – TYPO3 4.7 only will work with utf-8.
[…]
The forceCharset option has been deprecated in version 4.5. UTF-8 is now enforced. Even though other values than “utf-8” have not been possible anymore for some time, the option’s value has been queried at plenty of places within the whole core. These references, the option in the Install Tool, as well as many defaults with charset “iso-8859-1” in several classes have been changed, so TYPO3 now works UTF-8-only internally.

So it is clearly time to make the switch.

It is not that complicated – everything is described very well over here.

As the official wiki is very long and explains lots of stuff you might just not care, here are the basic steps:

  • Backup Database and Files
  • Set the charset in your webserver (e.g. “AddDefaultCharset utf-8” in a .htaccess)
  • Adjust some settings in localconf.php:
    // For backend charset
     $TYPO3_CONF_VARS['BE']['forceCharset'] = 'utf-8';
     $TYPO3_CONF_VARS['SYS']['setDBinit'] = 'SET NAMES utf8;'; 
    
     // For GIFBUILDER support
     // Set it to 'iconv' or 'mbstring'
     $TYPO3_CONF_VARS['SYS']['t3lib_cs_convMethod'] = 'mbstring';
     // For 'iconv' support you need at least PHP 5.
     $TYPO3_CONF_VARS['SYS']['t3lib_cs_utils'] = 'mbstring';
  • Adjust your typoScript (change language to your needs):
    config.locale_all = de_DE.utf-8
  • Convert your templatefiles to UTF-8 (and remap them if you use TemplaVoila) – usually in fileadmin/templates
  • Convert your DB to UTF-8
    1. Backup it first if you have not yet (believe me!)
    2. Paste this tool into fileadmin
    3. Run it by opening it in the browser (http://example.com/fileadmin/db_utf8_fix.php)
    4. If everything says “OK”, change the constant “SIMULATE” to false
    5. Run it again
    6. Clean cache of Typo3
    7. Check your site (esp. special characters). If the content is messed up or parts are missing, do the following:
      1. Restore the backup of the database (yes, I told you!)
      2. Uncomment lines 108 – 123 in db_utf8_fix.php
      3. Run it in browser againClean cache in Typo3
    8. Clean all cache in Typo3 Backend

You can find more detailed information here. There are also lots of other ways described how to convert the database.

Happy converting!


Update 2014-05-05: Changed link to db_utf8_fix-script as the original site is reported to be attacked and does not host the script anymore. I cannot check if the script at snipplr is exactly the same, but it looks so.