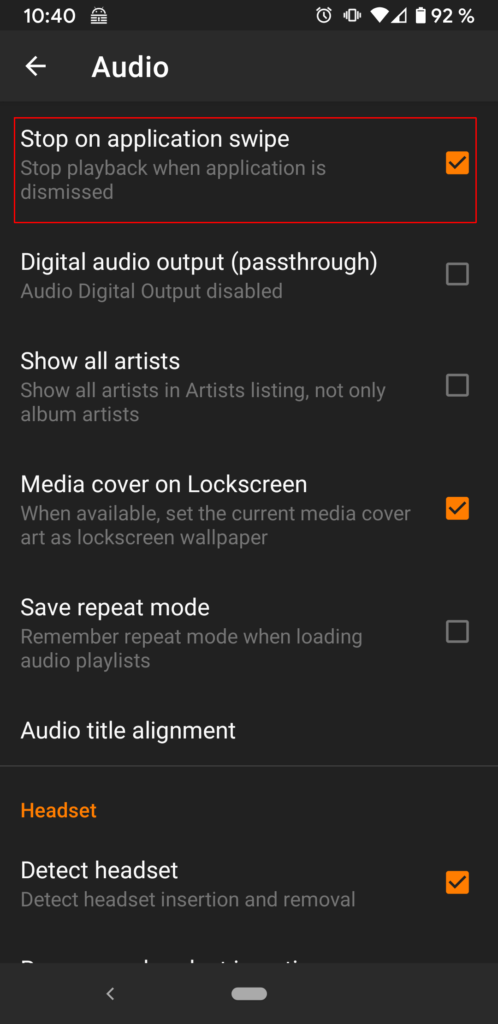
Enable the “Stop on application swipe” option in VLC so you can still close it when it is stuck.
The problem
VLC for android is a good media player for Android. It comes with a sleep timer, which is useful if you are listening to audio books before sleep. However, for me, it always gets stuck after the sleep timer expired. This means the players notification still looks like it was playing. But neither the notification can be swiped away nor the application. So there is no easy way to close the app. Play buttons do not work and I cannot start another audio file. So the app is completely stuck.
The workaround
There is an option in the VLC settings that makes the situation a lot better:
Settings / Audio / Stop on application swipe
Check this option and when VLC is stuck, you can at least close the app by swiping it away.
Saved your day?
If this tip saved your day, please drop a comment below to keep me writing these kind of blog posts.
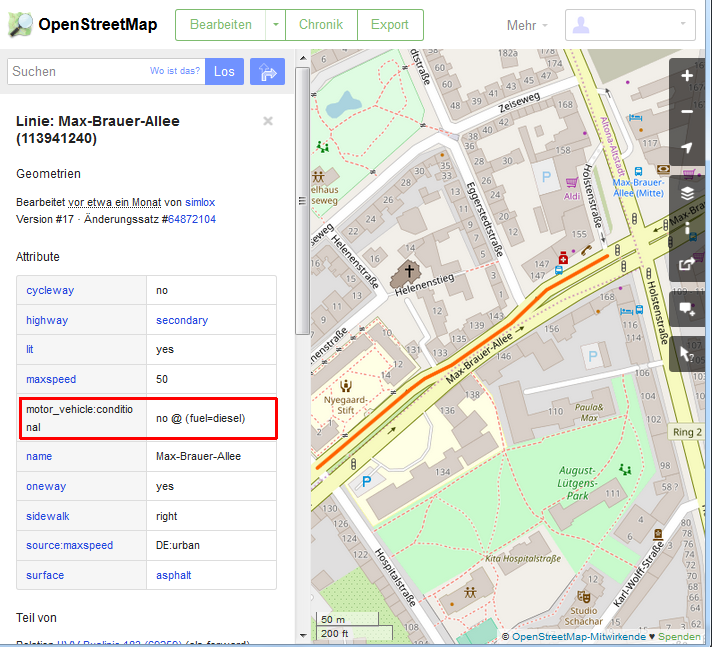
Hamburg hat als erste deutsche Stadt Fahrverbote für Diesel (Euro 4 und älter) eingeführt. Betroffen sind zunächst nur ca. 600 Meter der Max-Brauer-Allee und ca. 1,6km der Stresemannstraße. Wer mit seinem Euro 4 Diesel in Hamburg unterwegs ist, muss also den Umleitungsschildern folgen. Praktischer wäre es, wenn das Navi die gesperrten Straßen direkt von sich aus vermeiden würde. Ich habe mir die Eigenschaften der betroffenen Straßen in OpenStreeMap angesehen. Sie haben aktuell das Attribut mit dem Schlüssel motor_vehicle:conditional und dem Wert no @ (fuel=diesel), wie hier ein Abschnitt der Max-Brauer-Allee:
Dieselfahrverbot in OpenStreetMap
Da die Daten also schon in OpenStreeMap vorliegen, kann man nun Navis, welche auf OpenStreetMap-Karten basieren, beibringen diese Straßen auf Wunsch zu umfahren.
Das beliebte OsmAnd bietet die Möglichkeit, die Routing-Profile leicht selbst anzupassen. Dazu muss nur eine routing.xml Datei angepasst und auf dem Smartphone abgelegt werden.
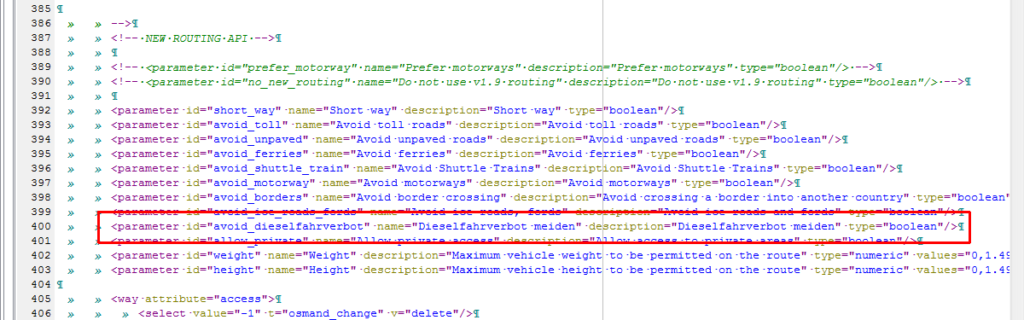
Ich habe mir die routing.xml von github heruntergeladen. Innerhalb des Routing-Profils für Autos (car) habe ich zunächst einen neuen Parameter eingefügt, mit dem man in der Oberfläche einstellen kann, ob Dieselfahrverbote gemeidet werden sollen oder nicht:
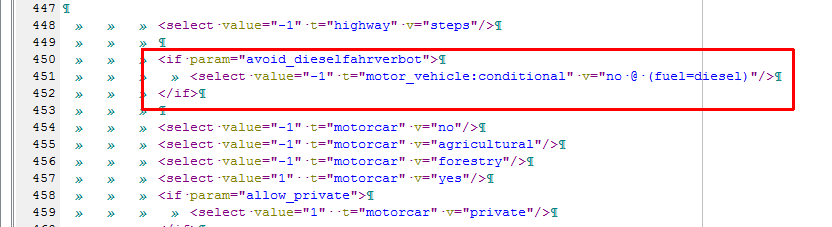
Als nächstes muss definiert werden, was geschehen soll, wenn der Benutzer die Option aktiviert hat. Dazu habe ich folgende Regel eingefügt, welche die Straßen mit dem oben genannten Parameter meidet:
Diese Regel lässt OsmAnd für Diesel gesperrte Straßen vermeiden.
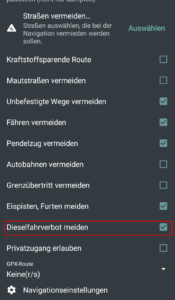
Ich habe sie unter /storage/emulated/0/Android/data/net.osmand.plus/files abgelegt, da dieser Ordner bei mir existierte. OsmAnd dann schließen (zur Seite wischen) und neu öffnen. Nun sollte in den Routingoptionen die neue Option erscheinen:
Die Option in den Routingeinstellungen
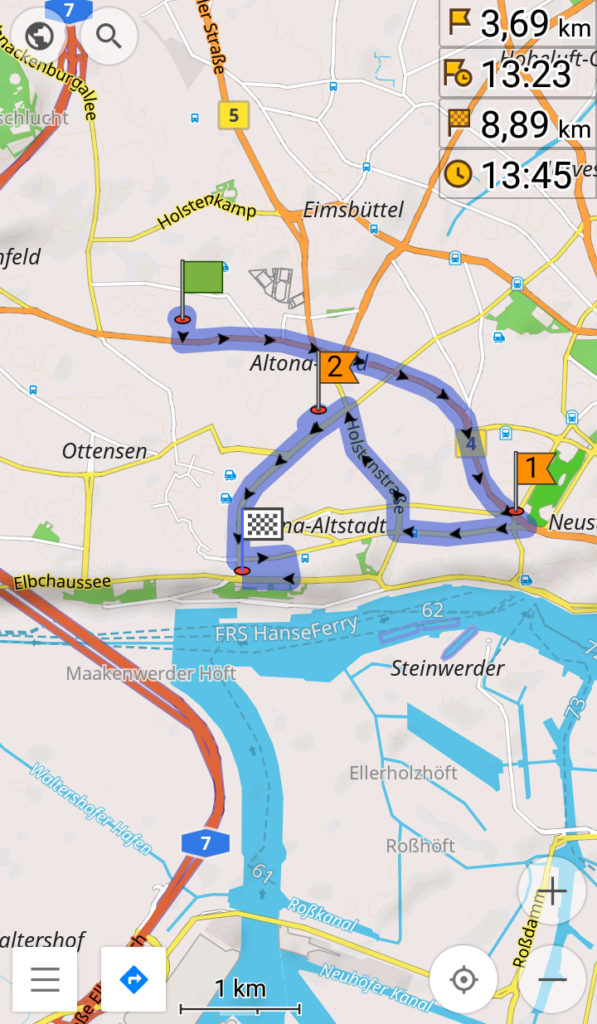
Wenn man nun Routen innerhalb Hamburgs berechnet, die normalerweise die für Diesel gesperrten Routen nutzen würden, kann man sehen, dass es funktioniert. Hier eine Route, die beide Straßen nutzt:
Route in Hamburg, auf der Dieselfahrverbote gelten
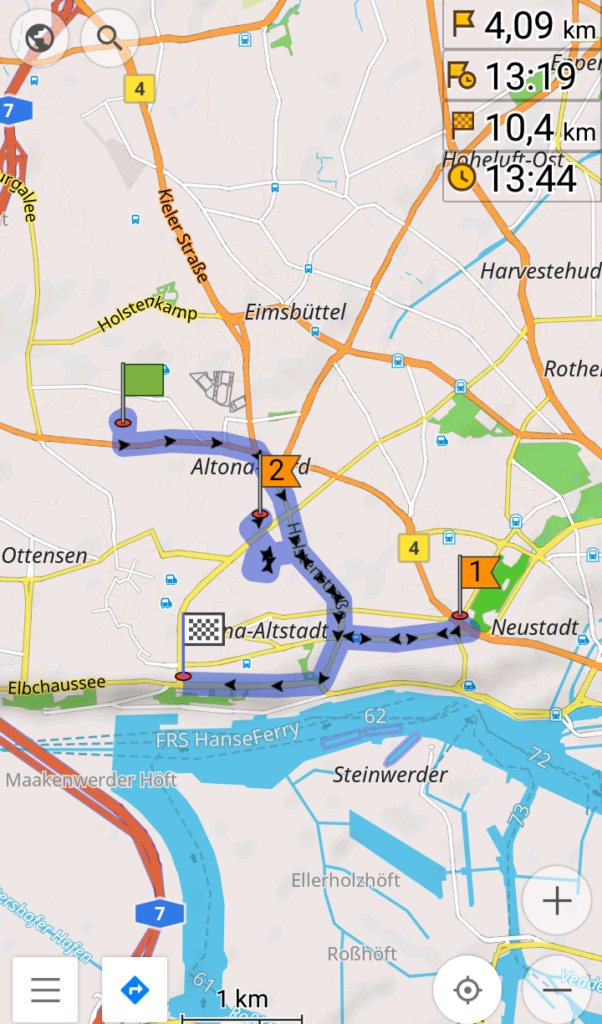
Aktiviert man nun die Option zum Meiden von Dieselfahrverboten, sieht die Route deutlich anders aus und meidet die gesperrten Straßen:
Alternative Route durch Hamburg ohne Dieselfahrverbote
Fahrverbote in Stuttgart und anderen Regionen
Ab dem 01.01.2019 gelten nun auch großflächige Dieselfahrverbote in Stuttgart. Leider funktioniert dieser Ansatz (aktuell) nicht für Stuttgart. Er vermeidet Straßen, welche das oben genannte Attribut aufweisen. In Stuttgart sind aber nicht einzelne Straßen, sondern das gesamte Stadtgebiet (genauer: die ausgewiesene Umweltzone) gesperrt. Ich habe erst heute in OpenStreetMap die bereits vorhandene Markierung der Umweltzone mit dem obigen Attribut versehen. Bis dies in den OsmAnd-Karten landet, wird es noch bis zu einen Monat dauern (außer man hat das Karten-Abo). Da es sich bei der Stuttgarter Umweltzone aber um eine Fläche und keine Straße handelt, werden wahrscheinlich noch Anpassungen an der routing.xml nötig, damit OsmAnd die Dieselfahrverbote in Stuttgart berücksichtigen kann. Sobald es hierzu neues gibt, werde ich diesen Artikel aktualisieren.
Paypal allows you to transfer money to your friends and family. To do so, you just need the email or phone number of the recipient. I just did this and noticed something interesting: I just gave the email address of the recipient, but in the list of transactions, paypal shows the full real name of my friend as recipient, and also sent me a mail that contains the full name. This means, you can easily find out the real name assigned to some mail address that is used as a paypal account by just sending a cent to the address. Of course the recipient will notice it, but probably will not complain.
This is especially interesting as paypal itself says in the footer of every email that scam mails will usually not include your real name. But scammers could first send you a cent to find out your real name and then greet you with your real name in the scam mail.
It seems to be a good idea to use an email address for paypal that you use nowhere else. This way, it is not possible to find out your real name through your normal mail address. Additionally, this has the advantage that you can ignore any phishing mail that you receive in the name of paypal, but through your normal mail address and not your paypal mail address.
I checked the validity of an HTML5 document (using the HTML Validator extension for Firefox, which I highly recommend) and found an error about a “bogus comment”. The comment looked normal:
<!–– some comment ––>
Then I read the HTML5 specification and found out that the bogus comment state instead of the “normal” comment state is entered if after “<!”, the parser cannot find two dashes. I remembered that I had copied the comment from the web and not typed it myself, so I deleted the –– and typed them manually. Looking closely, you can see the difference:
<!–– some comment ––>
<!-- some comment -->
After that, the bogus comment error was gone.
So the reason was that the – signs were not “normal”, but some other characters for longer dashes that look similar. So whenever you see a “bogus comment”, try to type the comment tags yourself…
Recently, when trying to watch a video in Amazon Instant Video, I only got Error 1002. I tried Firefox, Chrome, Opera and Internet Explorer and none of them worked. I reinstalled Silverlight and this also did not help.
Then finally I found the reason: Amazon still seems to use SSL 3 for Instant Video streams! Because Google recently reported security problems with SSL 3.0 (known as the POODLE security vulnerability), I disabled SSL 3.0 in all browsers including Internet Explorer. No matter what browser you use, Silverlight will use Internet Explorer’s settings and will not use SSL 3.0 any more. Re-enabling SSL 3.0 again in the Internet Explorer settings fixed the problem with Amazon Instant Video. As I am not really using Internet Explorer anyway, I don’t care much about this, but Amazon should really work on this to make Instant Video available without the need to enable SSL 3.0.
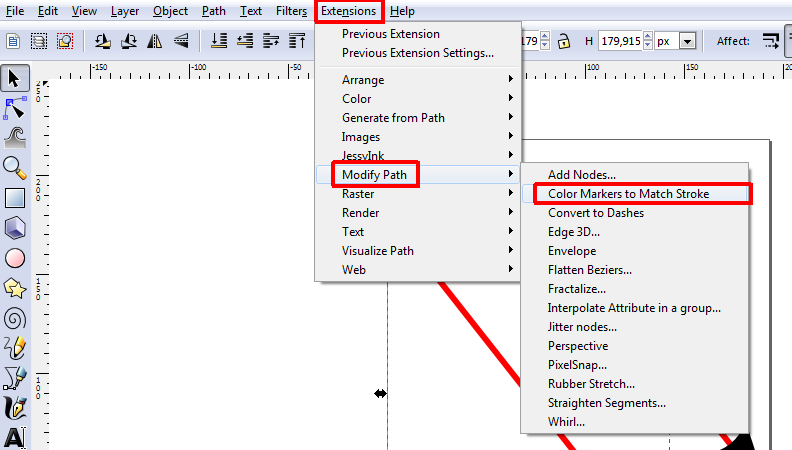
In Inkscape, a great open source vector graphics program, when you change the stroke color of a path, the arrow heads still remain black. But there is a way to change their color, although quite unintuitive.
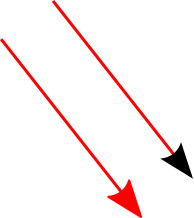
This is how it looks like:
Inkscape: arrows can have the same arrowhead color as the path
And this is how its done:
Mark the Path you want to change the color of the arrowhead
“Extensions”
“Modify Path”
“Color Markers to Match Stroke”
That’s it!
Update: Inkscape 0.91
In Inkscape 0.91, this problem is “fixed”: The arrowhead automatically gets the Stroke-color assigned and the extension mentioned above is gone. But:
Sometimes when I change the stroke color, the arrowhead does not get updated. In this case, you can adjust the arrowhead color like this:
Select the arrow, double click the color next to “Stroke:” on the lower left of the screen, it opens the window to adjust the stroke color and without doing anything in this window, it magically adjusts the color of the arrowhead.
Update: Inkscape 0.92
Unfortunately, I still have issues with the arrowhead color in Inkscape 0.92 and the workarounds above do not seem to work anymore. However, these problems only occur in old documents that I try to edit. In new documents, the arrowhead color works as expected. My current workaround is to create a new document, create the arrow I want there and then copy it into the old document. This way, I get arrows where I can edit the arrowhead color by editing the stroke color as expected.
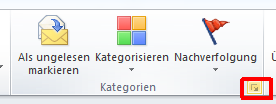
So kann man sich in Outlook 2010/2016 die Header anzeigen:
Nachricht öffnen (doppelt anklicken).
Bei “Kategorien” (Office 2010) bzw. “Markierungen” (Office 2016) auf den kleinen Pfeil unten rechts klicken
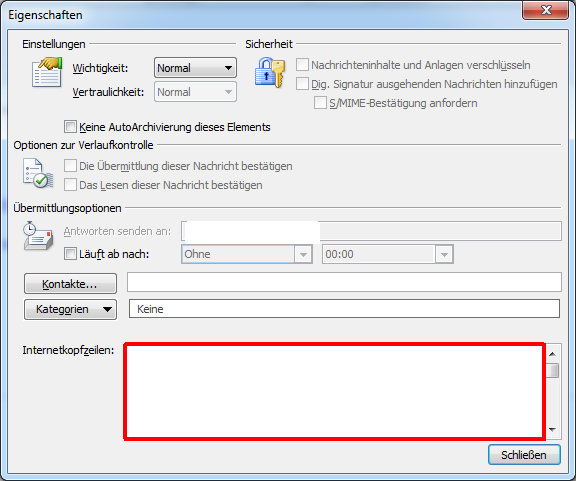
Unter “Internetkopfzeilen” finden sich die Header:
“Kategorien” / “Markierungen” wäre das letzte, wo ich danach gesucht hätte (bzw. habe). Ich finde das extrem unintuitiv platziert, wahrscheinlich ist aber vor allem die deutsche Übersetzung hier besonders schlecht.
Vielleicht verkürzt dieser Beitrag ja jemandem die verzweifelte Suche.
In case you have split your LaTeX document (let’s say main.tex) into multiple parts (let’s say part01.tex, …) and use include or input to stick it back together, you cannot compile part01.tex because it misses all the header stuff. So you need to compile main.tex. But is there a way in TeXworks to compile it using the Play-Button or CTRL+T?
Yes, there is. Add this line at the top of part01.tex etc:
% !TEX root = main.tex
Then just compile your files normally. It will compile main.tex, show the main.pdf in the preview and you can even navigate nicely using the context menu from pdf to tex and back.
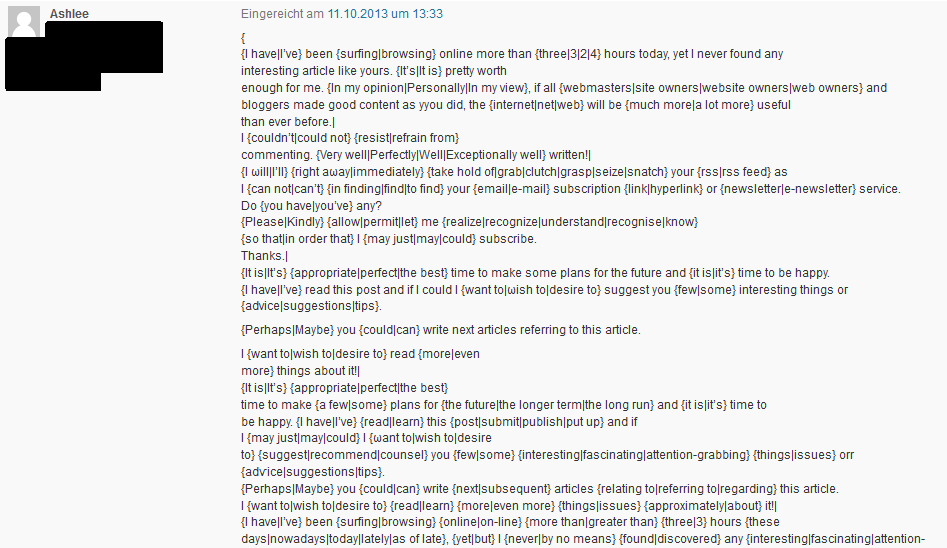
Today I got this spam comment with probably all the possible spam combinations this spammer uses:
This is only the first part, the complete comment is about 5 times as long. I guess it’s not the best approach to give all your beautiful spam away at once. Not only because only a complete fool would not mark this as spam but also because it’s probably the best way to make sure that spam filters will detect all your stuff 😀
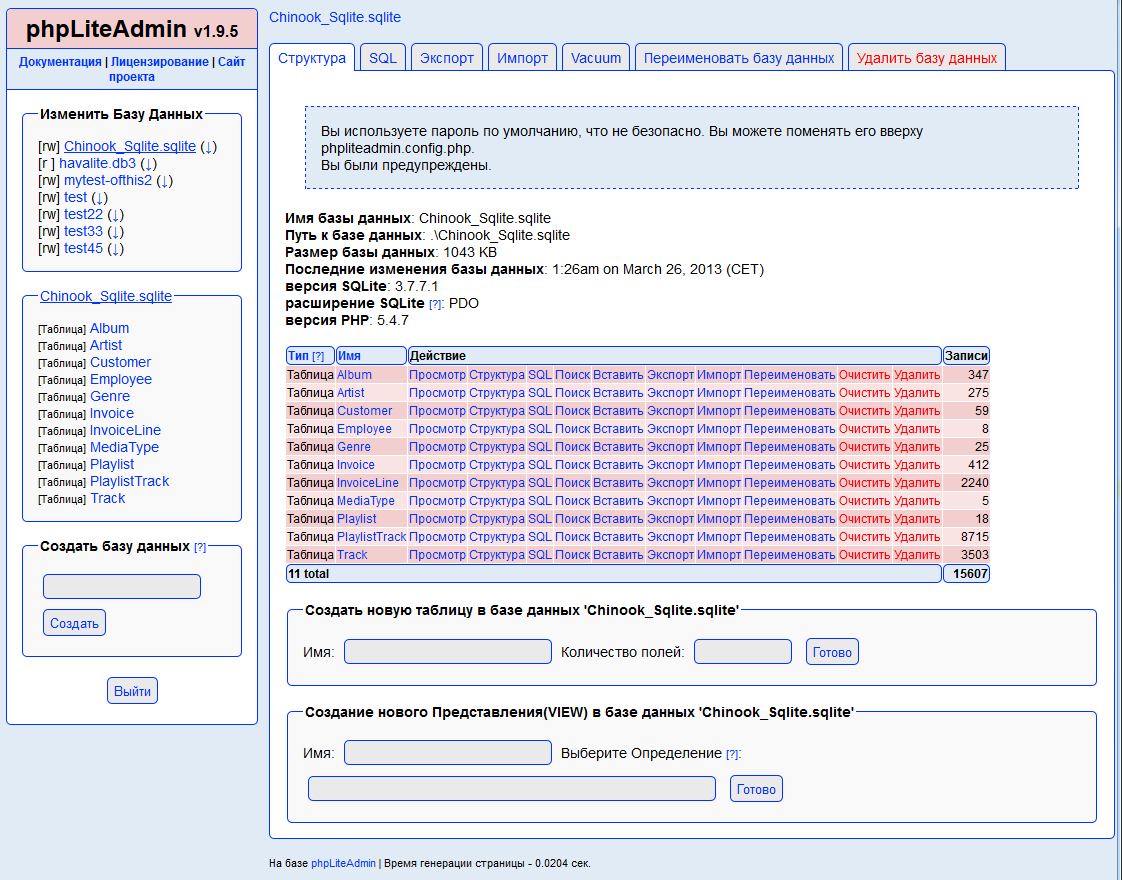
To install localization packages for phpLiteAdmin, just unzip them in the phpLiteAdmin folder or the “languages” subfolder and adjust $language in the configuration (e.g. to “ru” for Russian).
It is very easy to translate phpLiteAdmin into your language. Everything is explained very well in the wiki. You can also find other localization packages there for German and Russian. If your language is not yet translated, please do so and send us the file in our discussion group.
HTML5: why is my comment a ‘bogus comment’!?
I checked the validity of an HTML5 document (using the HTML Validator extension for Firefox, which I highly recommend) and found an error about a “bogus comment”. The comment looked normal:
Then I read the HTML5 specification and found out that the bogus comment state instead of the “normal” comment state is entered if after “<!”, the parser cannot find two dashes. I remembered that I had copied the comment from the web and not typed it myself, so I deleted the –– and typed them manually. Looking closely, you can see the difference:
After that, the bogus comment error was gone.
So the reason was that the – signs were not “normal”, but some other characters for longer dashes that look similar. So whenever you see a “bogus comment”, try to type the comment tags yourself…
Hope this helps somebody.
Discussion Forum