DeutschEnglish

Submenu

 - - - By CrazyStat - - -

10. April 2014

Inkscape: Change Arrowhead color

Filed under: Linux,Uncategorized,Windows — Tags: , , , , , — Christopher Kramer @ 18:55

In Inkscape, a great open source vector graphics program, when you change the stroke color of a path, the arrow heads still remain black. But there is a way to change their color, although quite unintuitive.

This is how it looks like:

Inkscape: arrows with same arrowhead color as the path

Inkscape: arrows can have the same arrowhead color as the path

And this is how its done:

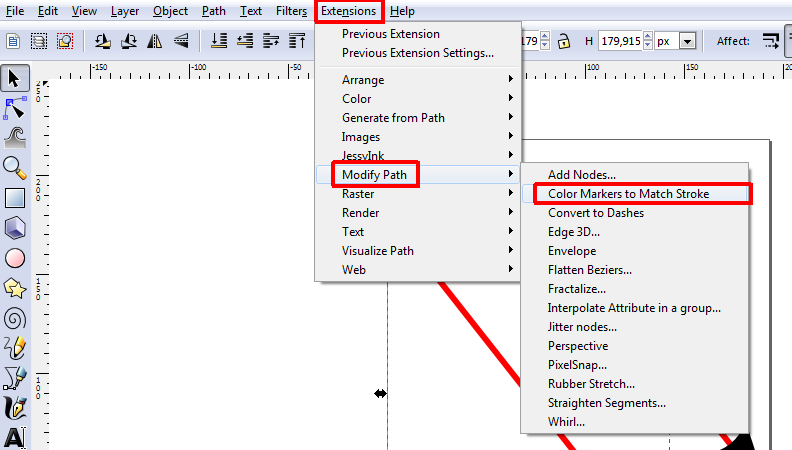
  1. Mark the Path you want to change the color of the arrowhead
  2. “Extensions”
  3. “Modify Path”
  4. “Color Markers to Match Stroke”

That’s it!

inkscape_arrows_color

Update: Inkscape 0.91

In Inkscape 0.91, this problem is “fixed”: The arrowhead automatically gets the Stroke-color assigned and the extension mentioned above is gone. But:

Sometimes when I change the stroke color, the arrowhead does not get updated. In this case, you can adjust the arrowhead color like this:

Select the arrow, double click the color next to “Stroke:” on the lower left of the screen, it opens the window to adjust the stroke color and without doing anything in this window, it magically adjusts the color of the arrowhead.

Update: Inkscape 0.92

Unfortunately, I still have issues with the arrowhead color in Inkscape 0.92 and the workarounds above do not seem to work anymore. However, these problems only occur in old documents that I try to edit. In new documents, the arrowhead color works as expected. My current workaround is to create a new document, create the arrow I want there and then copy it into the old document. This way, I get arrows where I can edit the arrowhead color by editing the stroke color as expected.

Recommendation

Try my Open Source PHP visitor analytics script CrazyStat.

1. April 2014

Outlook 2010/2016: Nachrichtenkopfzeilen (Header) anzeigen

Filed under: Uncategorized,Windows — Tags: , , — Christopher Kramer @ 18:15

So kann man sich in Outlook 2010/2016 die Header anzeigen:

  • Nachricht öffnen (doppelt anklicken).
  • Bei “Kategorien” (Office 2010) bzw. “Markierungen” (Office 2016) auf den kleinen Pfeil unten rechts klicken
    outlook_header
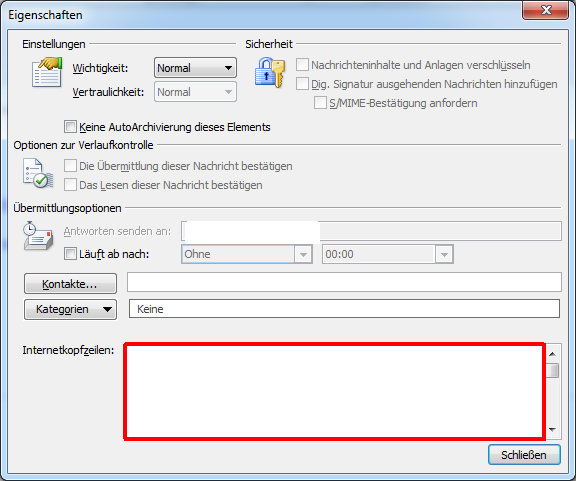
  • Unter “Internetkopfzeilen” finden sich die Header:
    outlook_header2

“Kategorien” / “Markierungen” wäre das letzte, wo ich danach gesucht hätte (bzw. habe). Ich finde das extrem unintuitiv platziert, wahrscheinlich ist aber vor allem die deutsche Übersetzung hier besonders schlecht.

Vielleicht verkürzt dieser Beitrag ja jemandem die verzweifelte Suche.

23. April 2013

Enlarge dynamic and fixed VHD virtual hard drives

Filed under: Windows — Tags: , , , , , , , , — Christopher Kramer @ 23:42

If you use Virtual PC or built-in Windows backup for example, you probably use virtual hard drives stored in vhd-files.

I already blogged once about how you can mount such a vhd file easily in Windows.

But there is one big problem with vhd files: When you create them, you often don’t really know how big the file should be. You can use a dynamic vhd to solve this partly (at the cost of performance), but still you need to give a maximum size.

And then the time will come when you realize your vhd needs to be bigger then you specified it. So here is how you can enlarge vhds – no matter whether they are fix sized or dynamic.

Enlarge vhd file using diskpart

You can enlarge the vhd file in diskpart. Start diskpart, e.g. with [Windows-Key]+[R], type “diskpart” and hit [enter]. UAC will prompt you for permission (say “Yes”). So now select your virtual disk using the following command:

select vdisk file="C:\path\to\vdisk.vhd"

Now enlarge the disk using this command:

expand vdisk maximum=10000

In this example, 10000 means that the new total size of the disk is 10 000 MB (adjust the number to your needs).

So now your virtual hard drive grew larger. But the partition inside still has the old size. So you need to enlarge the partition as well.

Enlarge the partition in the virtual disk using Disk management

The easiest way to do this is to use Windows Disk Management, which is part of Computer Management . The fastest way to get there in Windows 7 is to click the Windows icon and enter “Disk Management” and start the appearing “Windows Disc Management” (Windows UAC will again ask you for permission, say “Yes”). Or, also for other Windows version, [Windows]+[R] and type “diskmgmt.msc” and hit enter.

Open the VHD with “Action” / “Attach VHD”. Choose the file, make sure “readonly” is not checked and click “OK”.

Then you will see the VHD just like your normal drives in the graphical overview. There you will see the partition in blue (or dark green, if it is a logical one) and the empty space in light green. Right-click the partition and choose “Extend Volume”. The tool  will propose to use all the empty space so you can just accept that and that’s it. Finally, right click the VHD drive and select “Detach VHD”. Make sure you don’t select the option to delete the VHD file after detaching!

Enlarge the partition in the virtual disk using diskpart

You can also achieve the same thing in diskpart (i.e. on the console, not using the GUI).

Open diskpart, and mount the VHD using:

select vdisk file="C:\path\to\vdisk.vhd"
attach vdisk

Then do

list volume
select volume=<No of volume>
extend size=100

Instead of <No of volume>, you need to enter the number of the volume (see output of “list volume”).

In this example, the partition gets enlarged by 100 MB. Here you need to specify the relative amount of space that gets added.

Finally, detach the vdisk:

detach vdisk

Problems? Just ask!

I hope this helps somebody. If so, please drop a comment. If you have problems, also just drop a comment.

13. March 2013

TortoiseSVN: after stopping merge, workspace is “locked”

Filed under: Windows — Tags: , , , , , , , , — Christopher Kramer @ 20:43

TortoiseSVN is a great Windows Application to access (and even create) SVN repositories. It integrates perfectly into Windows Explorer and has very good merge and diff tools. In my opinion it’s simply the best Windows SVN client available. If you don’t use it already, you should give it a try.

Problem: Working Copy locked after Merge failed

When I tried to apply a patch using TortoiseSVN, I noticed I wanted to apply another patch instead and therefore closed the merge program before it was started completely.

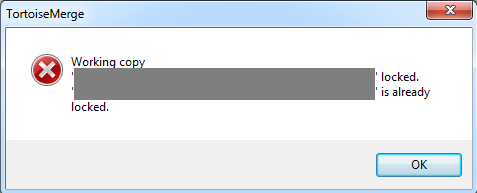
After this, I was not able to apply the other patch. TortoiseMerge said the workspace was locked:

TortoiseMerge: Workspace locked

TortoiseMerge: “Workspace copy is already locked”

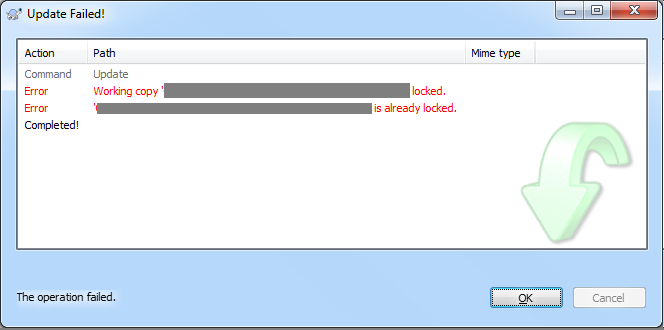
It was also not possible to update the workspace:

Update: Workspace locked

Update: Working Copy is locked

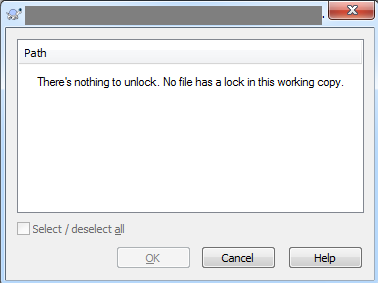
So I tried to unlock it, which is not possible:

TortoiseSVN: "Nothing locked"

TortoiseSVN: “There is nothing  to unlock”

So this is pretty strange. Here is how to solve it:

Solution: Clean up working copy status

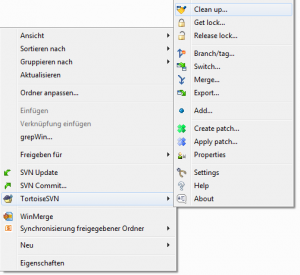
Right-click on the directory and choose “TortoiseSVN”/”Clean Up”.

TortoiseSVN: Clean up

TortoiseSVN: Clean up

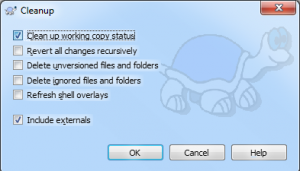
Then only choose “Clean up working copy status”:

TortoiseSVN.:Clean up working copy status

TortoiseSVN.:Clean up working copy status

Click “OK” and that’s it. You can now again update or apply patches without any problems.

I hope this helps somebody to solve his problem a little faster.

26. November 2012

CrazyStat: Detect Windows 8

Filed under: CrazyStat,PHP,Windows — Tags: , , , , — Christopher Kramer @ 10:50

To make CrazyStat detect Windows 8, just replace stat/usr/keywords/os.txt with the one I just committed to svn.

Download it here

(If this link does not work, use this one and click “download this file” there.)

Just upload this file to stat/usr/keywords.

22. November 2012

Windows: How to find out the MAC address of your ethernet / wireless adapter?

Filed under: Windows — Christopher Kramer @ 15:25

Trying to find out the MAC-address of my ethernet adapter, I tried ipconfig and all the properties of the adpater in device manager but could not find it. Then I found out that ipconfig displays it, if the /all switch is added:

ipconfig /all

This will list all your network devices. Their MAC addresses are listed as the “Physical address”.

To run this, you need a command window. You can get it like this:

[Windows-Key] + [r]

Type in “cmd” and hit enter.

Then you get a black window with white text where you enter “ipconfig /all”.

(The windows-key is the one between the left CTRL and ALT. If you don’t have one (I heard this still exists ;-)), click Start/Run in Win XP or click Start, type “cmd” and then enter in Win7).

14. May 2012

Mount clonezilla image to restore single file (browse)

Filed under: Linux,Windows — Tags: , , , , , , , , , , — Christopher Kramer @ 12:28

Clonezilla is a fine tool to backup/restore/clone partitions or drives. It is very powerful, can handle both Linux and Windows partitions and so on. If you do not know it, you should really give it a try. It is really free software (open source), which means it is also free to use for commercial purposes.

By the way, if you want to backup/restore images of Windows partitions/drives, I’d also recommend DriveImage XML which is also very powerful yet simple (only free for private use). Windows 7 has also built-in backup and imaging tools, which you can give a try. But this post is about Clonezilla.

One important feature that Clonezilla does not offer out of the box is browsing images to restore single files. You can only restore complete partitions or drives.

But there is a way around this, which is discussed in this forum thread, although not perfect as it requires lots of time and disk space as well.

The basic approach is to convert the whole image into a (probably huge) img-file that can be easily mounted. In the forum post linked above several different commands are discussed depending on your image file.
Here I’d like to show you what worked for me.

In my case, the file was compressed using gzip and it was an image of a linux partition (ext3). I used Ubuntu Linux to mount the image. The steps I took:

  1. Install partclone (sudo apt-get install partclone)
  2. Prepare an img-file somewhere where enough free disk space is available:
    touch /dir-to-new-image/partition.img

    You should have at least as much free disk space as the size of the image there.

  3. Convert the clonezilla-image into the img-file:
    sudo cat /dir-to-images/partition.ext3.ptcl-img.gz.*
    | sudo gzip -d -c
    | sudo partclone.restore -C -s - -O /dir-to-new-image/partition.img

    (This is one line. Note the minus after -s. I overlooked it when I tried this first.)
    This will take some time, dependent on how big the image and how fast your drive(s).
    There are other commands in the forum thread for NTFS images and other compression formats.

  4. Mount the img-file:
    sudo mount -o loop -t ext3 /dir-to-new-image/partition.img /mnt

Thanks a lot to all posters of the forum mentioned above for these hints, especially bfitzhugh, nutria007, ttguy and gaebriel!

P.S.: It’s always good to have a (recent) backup 😉 One drive of mine just crashed after about two years in operation, so I know what I am talking about…

Think about what pain it would be if the drive of your laptop / desktop would crash just right now. If you get a bad feeling thinking about this, you should make a backup now.

5. May 2012

TortoiseSVN painfully slow (Log)

Filed under: Windows — Tags: , , , , , , — Christopher Kramer @ 21:14

I had a problem with TortoiseSVN: Sometimes it behaved painfully slow. Especially when I wanted to view the log of CrazyStat’s svn repository, it took about 10 minutes (!) to show it. First I thought the problem was caused by the Sourceforge servers, but then I realized that other svn clients did not have the same problem. I tried several things and the solution finally was quite simple and even listed the the TortoiseSVN FAQ:

Browsing very slow in explorer and file/open dialog.

If you have mapped network drives which are not resolved, either because the drive is inaccessible, or you have not logged in, file browsing may become unresponsive while Windows tries unsuccessfully to access the drive. Either unmap the drive or ensure that it can be accessed


I first did not think that this was my problem as I did not experience slow browsing in explorer or file/open dialog. But after I unmapped all unresolved network drives, it worked great again.

By the way, I’d recommend TortoiseSVN to anybody who is searching for a windows svn client. I have not seen any other client that powerful yet simple.

I hope this might be helpful for somebody who has the same problem.

26. March 2012

autoNUM turns NUM on when external keyboard is connected

Filed under: Windows — Tags: , , , , , , , , — Christopher Kramer @ 11:41

autoNUM a small tool meant for laptops/notebooks. It turns NUM on automatically when you connect your external keyboard to your notebook. When you disconnect it, it automatically turns NUM back off again.

This is very helpful if you use an external keyboard frequently and love to use NUM when it is plugged in.

The tool has been available for quite a while now, but now an important update has been made. It fixes a bug that made autoNUM not recognize that the keyboard is not connect on startup. This is now fixed. Furthermore, the UI has been slightly improved.

Check out the tool and tell me if you like it.

29. February 2012

Windows: Mount VHD-file (virtual hard disk) via Right-Click

Filed under: Windows — Tags: , , , , , , — Christopher Kramer @ 12:18

You might know .vhd-files from Virtual PC or Windows Backup. In case you need to access a file from such a virtual hard drive, you can easily mount it in Windows.

It is possible via drive manager, but today I found a solution that is even a lot easier: Just right click a vhd-file and select to mount the file via “send to”.

Here is the tutorial including the necessary batch scripts:

How-To Geek: Mount and Unmount a VHD File in Windows Explorer via a Right-Click

Works great on Windows 7 – not tested any other version.

« Newer Posts