DeutschEnglish

Submenu

 - - - By CrazyStat - - -

6. April 2021

Open PHP Scripts in Browser from Windows Explorer

Filed under: PHP,Windows — Tags: , , , , , — Christopher Kramer @ 19:07

PHP is a scripting language, so a PHP parser is needed to run PHP scripts. Furthermore, a webserver like Apache is required to run web applications written in PHP. We assume you already have all that installed (e.g. you installed xampp). Now you have php files in your htdocs-folder and want to open them in the browser, parsed by php and served by your local webserver? But that requires the browser to point to http://localhost/ instead of file://C:/xampp/htdocs/. I solved this by opening a tiny PHP script in the browser that redirects to the correct location. Here is how to set it up:

  1. Download FileTypesMan (direct download link for x64)
  2. Unzip FileTypesMan and run FileTypesMan.exe . Confirm the UAC prompt.
  3. Click Edit / Find and enter “php” in the search field
  4. If you do not find a row with the extension “.php” in the table, then:
    a) Double click a php-file in explorer and assign a default application to launch. This could be a text editor like notepad++, and IDE like Visual Studio Code, or notepad.exe.
    b) In FileTypesMan click File / Refresh Desktop now and search again for “php”. You should find it now.
  5. While the row “.php” is selected, click Actions / New action.
  6. Assign an action name like Parse php and open in Firefox
  7. Click “Browse…” and select the executable of the browser that should get launched, e.g. C:\Program Files\Mozilla Firefox\firefox.exe
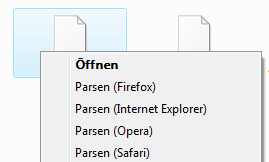
  8. Now change the Command-Line so that after the path to the browser, the first argument is "http://localhost/load.php?file=%1" . This makes the browser open said php-file parsed by localhost and pass the filepath as parameter file. It should look similar as in the screenshot.
  9. Select “Default Action” if you want this action to happen on double-click.
  10. Click OK. You may create similar actions for other browsers.
  11. Drop the file load.php in your htdocs document root folder with the following content:
<?php
$htdocs = $_SERVER["DOCUMENT_ROOT"];
$webserver = "http://".$_SERVER["HTTP_HOST"];
if(empty($_GET['file'])) $redirectTo = $webserver;
else {
    $file = trim(str_replace("%20", " ", str_replace("\\\\", "/", str_replace(DIRECTORY_SEPARATOR, '/', $_GET['file']))));
	$inDocumentRoot = strpos($file, $htdocs)!==false;
	if(!$inDocumentRoot) { 
	    die('The file is not in the document root!');
	}
	$redirectTo = $webserver.str_replace($htdocs,"",$file);
}
header('Location: '.$redirectTo);
exit;

Now you can launch php files right from the context menu in Explorer or through double click. You can delete FileTypesMan now.

Please drop a comment it this made your day.
Recommendation

Try my Open Source PHP visitor analytics script CrazyStat.

19. March 2019

PHP: DateTime::createFromFormat fails for string read from CSV

Filed under: PHP — Tags: , , , , , — Christopher Kramer @ 19:31

I wrote a small PHP script to import a dozen csv files exported from Excel into a database. The CSV import basically looked like this:

&lt;?php
$f = "file.csv";	
if (($handle = fopen($f, "r")) !== FALSE) {
    while (($data = fgetcsv($handle, 1000, ";")) !== FALSE) {
         $date = DateTime::createFromFormat('d.m.Y', $data[0]);
         // Inserting this along with other data into a DB
    }
} ?>

And now what happened is that $date was false. So I fetched the errors like this:

var_dump(DateTime::getLastErrors());

And this returned:

array(4) {
  ["warning_count"]=>
  int(0)
  ["warnings"]=>
  array(0) {
  }
  ["error_count"]=>
  int(1)
  ["errors"]=>
  array(1) {
    [0]=>
    string(22) "Unexpected data found."
  }
}

So I added var_dump($date), but it gave string(13) "31.01.2019", which looked right. But looking closely, the string length of 13 seems a bit long for a 10 character date, right? I tried trim() , but without luck. And then I remembered that I had a similar problem before where invisible empty space was due to the UTF-8 Byte Order Mark (BOM). This is a sequence of “inivisible” bytes at the beginning of a textfile that define in which unicode encoding the file is (UTF-8, UTF-16, …) and its endianess (big-endian or little-endian). Microsoft Office programs such as Excel or Word like to write this to the beginning of a file, but other programs may do so as well.

So the solution is simple: In the first line, strip the BOM if it is there:

&lt;?php
$f = "file.csv";
$bom = pack('CCC', 0xEF, 0xBB, 0xBF);
$firstline=true;
if (($handle = fopen($f, "r")) !== FALSE) {
    while (($data = fgetcsv($handle, 1000, ";")) !== FALSE) {
         if ($firstline and substr($data[0], 0, 3) === $bom)
             $data[0] = substr($data[0], 3);
         $firstline=false;
         $date = DateTime::createFromFormat('d.m.Y', $data[0]);
         // Inserting this along with other data into a DB
    }
} ?>

So this just checks whether the first three bytes in the file match the UTF-8 BOM added by Excel and in case it detects them, it remove these bytes. Now the date parses fine. If your file has a different BOM, e.g. for UTF-16, you may need to change the definition of $bom. Just check your file in a hex-editor to find the first three bytes. This is PSPad, a great text-editor that includes a HEX-editor:

Note the first three bytes EF BB BF, which are the BOM.

If this helped you to solve your problem faster, please drop a comment below. This motivates me to keep writing these articles.

29. August 2018

phpBB: Upgrade fails (timeout) – solution and how to update on the CLI

Filed under: PHP,Server Administration — Tags: , , , , , , , — Christopher Kramer @ 10:46

So if you are getting a Timeout when updating phpBB to 3.2.2, it tells you to either increase the maximum time limit or do the update on the CLI.

How to update on the CLI

Of course, this requires that you have access to the CLI.

  • On the CLI, go into the install folder of phpBB
  • Create a file named config.yml that contains this:
    updater:
        type: db_only
  • Make sure the above file does not end with newlines
  • Run:
    php ./phpbbcli.php update config.yml

Fixing the update timeout problem

In my case, the CLI update gave this error:

PHP Fatal error:  Call to a member function fetch_array() on resource in [...]/install/update/new/phpbb/db/migration/data/v32x/fix_user_styles.php on line 42

This is a bug in the migration script. The most easy way to fix it, is to go into your config.php and change the $dbms from mysql to mysqli. This is recommended anyway.

If this is not possible for you, open the mentioned file and search for:

$enabled_styles = $result->fetch_array();

And replace this with:

$enabled_styles = $this->db->sql_fetchrowset($result);

Thanks to RMcGirr83 and Marc on this thread.

5. July 2018

PHP: trying to catch an Exception, but it never gets caught?

Filed under: PHP — Tags: , , , , , — Christopher Kramer @ 20:24

You are trying to catch an Exception like this and it never gets caught?

<?php
try {
// whatever you do here
// probably, you use some library
} catch(Exception $e) {
// this never works
}
?>

Most likely, your app is in some namespace. This means with the above code you only catch exceptions of the namespace of your app, not any exception. The solution is easy, just add a backslash:

try {
// whatever
} catch(\Exception $e) {
// this should work
// note the backslash!
}

Hope this helps somebody.

9. June 2017

Automatically run WP-CLI as the correct user

Filed under: Linux,Server Administration,Wordpress — Tags: , , , , , , — Christopher Kramer @ 19:04

You are root, your php runs with a different user for each site / customer e.g. using PHP-FPM. And these users don’t have a shell assigned. So how can you easily run wp-cli with the correct user to avoid permission denied-problems?

This is how: Define an alias for wp in your shell config, e.g ~/.bash_profile like this:

alias wp='sudo -u `stat -c '%U' .` -s -- php /usr/local/wp-cli.phar --path=`pwd` '

This will first run stat -c %U . to get the owner of the current folder. Then it will pass this to sudo to execute the command as this user. You might need to adjust the path to the phar-file.

Relogin so the alias takes effect and have fun! 🙂

Now when you are in the folder of some site and run wp-cli with the wp command, it will always automatically run with the user that is the owner of the wordpress-folder, which should be the user assigned to this site.

This is tested on a Debian Wheezy system. On FreeBSD, you would need to adjust it slightly:

alias wp='sudo -u `stat -f '%Su' .` -s -- php /usr/local/wp-cli.phar --path=`pwd` '

Let me know if this saved your day or you still have some problems.

15. November 2016

Typo3 Mask – Javascript and CSS includes of extensions missing

Filed under: JavaScript,Typo3 — Tags: , , , , , , — Christopher Kramer @ 11:36

I was using Mask 2.1.1 with Typo3 7.6.11 for a site as described in the Mask manual with this typoscript:

page < temp.mask.page
page.10.file.stdWrap.cObject.default.value = fileadmin/templates/index.html
page {
        includeCSS.styles = fileadmin/templates/style.css
}

The problem with this was that the CSS and JS files includes from extensions where missing, even though the static templates of this where included. The reason is that this typoscript overwrites the page.include* stuff defined by the templates.

A workaround

To solve this, I copied the page.include* stuff defined by the extensions in a temporary variable and restored it after loading the mask object into page:

tempJSFooterlibs < page.includeJSFooterlibs
tempJSFooter < page.includeJSFooter
tempCSS < page.includeCSS

page < temp.mask.page
page.10.file.stdWrap.cObject.default.value = fileadmin/templates/index.html
page {
        includeJSFooterlibs < tempJSFooterlibs
        includeJSFooter < tempJSFooter
        includeCSS < tempCSS

        includeCSS.styles = fileadmin/templates/style.css
}

There are more includes you might need to consider if your extensions use these:

page.includeJS
page.includeJSlibs
page.jsInline
page.jsFooterInline

Hope this helps someone with the same problem! Please let me know if there is an easier solution.

Update 06.07.2017: The clean way

So the workaround described above works, but it has a disadvantage: You might install a plugin that defines some other page.* property that gets lost. For example, I just had this problem with mindshape_cookie_hint: It defines page.9877 which gets lost when you overwrite page with temp.mask.page. It took quite some time until I found the reason for this problem. And then I found another way which is much simpler than the one described before:

page = PAGE
page.10 < temp.mask.page.10

Just don’t copy the whole temp.mask.page, only temp.mask.page.10. This will preserve all the stuff defined by plugins. The solution is so simple and easy!

So I think this is not really a bug in mask, it is rather a mistake in the documentation.

Please let me know in the comments if this saved your day or if you have suggestions.

25. July 2016

Roundcube: Multiple identities (mail_domains) automatically created by default when user is created

The problem

Roundcube is a popular webmailer written in PHP. Today I configured it on a host where each user has multiple identities, one for each domain: E.g., user bob has the three identities:
bob@example1.org, bob@example2.org and bob@example3.org

The same for all other users.

When the user logs in for the first time in roundcube, all three identities should be automatically created. There is a config variable mail_domain, which can be used like this:

$config['mail_domain'] = 'example1.org';

This will make sure that when user bob logs in, the created identity will be bob@example1.org . You can give an array here, but only one domain per IMAP host. So using mail_domain, it seems that you currently cannot define multiple domains that will create different identities.

The solution

The solution that I found uses the plugin virtuser_query. This plugin lets you query mail identities from an SQL database. But within the SQL query, you can also statically configure all the domains like this:

$config['virtuser_query'] = array('email' => 
'SELECT "%u@example1.org" UNION 
SELECT "%u@example2.org" UNION 
SELECT "%u@example3.org"',
'user' => '', 'host' => '', 'alias' => '');

The plugin replaces %u with the username, e.g. bob. So this query will always return three rows, one for each domain. It is not really querying the database, it is just a workaround to configure multiple default domains in roundcube, as mail_domain currently does not allow us to do this.

For the plugin to work, you need to enable it like this:

$config['plugins'] = array(...,'virtuser_query'); 
// note: there is an underscore after virtuser

In my case the virtuser_query plugin was already included in Roundcube as I have installed the Debian package roundcube-plugins . If it is not already part of your roundcube installation, you can get in here.

I hope this helps somebody to solve this issue faster 🙂
Please leave a comment if it helped you, if you have problems with this, or if you found another way.

16. March 2016

Typo3: Redirect backend to https and frontend to http

Filed under: PHP,Security,Server Administration,Typo3 — Tags: , , , , , , , , , — Christopher Kramer @ 20:02

If you are using SNI to secure the access to your site through SSL, you might decide that you do not want to use SSL for the frontend, as users of old clients such as Android 2 or Internet Explorer 8 on Windows XP won’t be able to access the site. But for the backend, old clients should not be a problem.

So this solves the redirection in two ways:

  1. Frontend gets redirected to HTTP if accessed through https (optional)
  2. Backend gets redirected to HTTPS if accessed through http

Put this in your .htaccess after “RewriteEngine On” (assuming Apache webserver):

# 1. optionally: redirect FE to http
RewriteCond %{HTTPS} on
RewriteCond %{REQUEST_URI} !^/?typo3
RewriteRule (.*) http://%{HTTP_HOST}%{REQUEST_URI} [R=301,L]

# 2. redirect BE to https
RewriteCond %{HTTPS} off
RewriteCond %{REQUEST_URI} ^/?typo3
RewriteRule (.*) https://%{HTTP_HOST}%{REQUEST_URI} [R=301,L]

And hopefully, your backend access is now securely encrypted…

https


4. July 2015

phpLiteAdmin is now hosted on bitbucket

Filed under: phpLiteAdmin — Christopher Kramer @ 19:43

As Google code is shutting down, the open source project phpLiteAdmin which was hosted on google code all the time needed a new home. The team decided to use bitbucket. There were several reasons why we did not go for the most obvious one – github. Mainly, github does not offer some features we need.

I moved all the issues from the issue tracker to bitbucket and also imported the wiki pages and converted them into markdown syntax so everything is nice again. Downloads are also hosted on bitbucket now.

The git source repository is available on bitbucket as well as github. So if you want to fork phpLiteAdmin and send us pull requests, you can do so on any of the two plattforms.

This is phpLiteAdmin’s new home: https://bitbucket.org/phpliteadmin/public

And don’t tell us, you don’t want to create a bitbucket account – you don’t need to! You can log into bitbucket with your existing google, facebook, twitter or even github account!

The discussion group is still a google group.

21. May 2015

wp-cli: syntax error, unexpected ‘?’, error connecting to the database

Filed under: Server Administration,Windows,Wordpress — Christopher Kramer @ 10:55

Running wp-cli on a website that was set up by somebody else resulted in a strange error:

PHP Parse error:  syntax error, unexpected '?' in phar:///usr/local/wp-cli.phar/php/wp-cli.php(23) : eval()'d code on line 1
Error:
<h1>Fehler beim Aufbau der Datenbank-Verbindung</h1>
...

The database settings in wp-config.php were all correct and WordPress was also working, so this did not seem to be the problem. In the end, I found out the reason was a byte order mark at the beginning of wp-config.php that had been inserted probably by Windows Editor. To solve the issue, the easiest way is to open the file in a good editor, for Windows I recommend PSPad, copy everything into the clipboard (CTRL +A, CTRL + C), create a new empty file (CTRL + N), paste everything (CTRL + V), save it (CTRL + S) as wp-config.php and upload the file.


Older Posts »