DeutschEnglish

Submenu

 - - - By CrazyStat - - -

21. August 2020

Linux: Turn jpeg images lossless out of Nautilus

Filed under: Linux — Tags: , , , , , , — Christopher Kramer @ 22:13

Your camera does not always turn your images the correct way? You search for an easy way to turn multiple images in linux?

That’s the problem I just came across. And this is my solution:

In Nautilus, the default file manager in Ubuntu Linux and a lot of other linux distributions, you can easily run scripts out of the context menu. All you have to do, is place your script in the following directory:

~/.local/share/nautilus/scripts/SCRIPTNAME

Nautilus will pass the selected files as parameter. So all we need to do, is write a script that turns our image. I was searching for something that can turn .jpeg-images in a lossless way. This means, turning the image won’t reduce the image quality. A good tool for this job is jpegtran, which can be installed like this in Ubuntu:

sudo apt install libjpeg-progs

Now create the file ~/.local/share/nautilus/scripts/jpeg turn 90 with the following content:

#!/bin/bash
for FILE in "$@"; do
        jpegtran -rot 90 -outfile "$FILE" "$FILE"
done

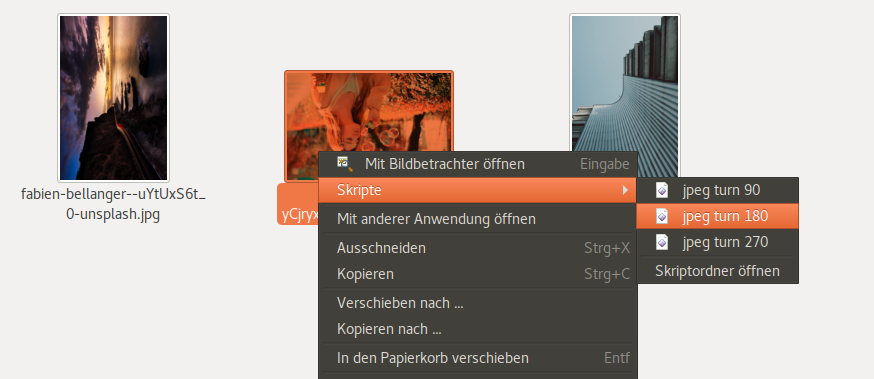
Now you can right-click jpeg files and turn them easily in Nautilus:

You can even select multiple images in Nautilus and turn all of them at once.

Now create jpeg turn 180 and jpeg turn 270 scripts with 180 and 270 after -rot instead of 90 in the script. This way, you can easily turn images by 180 or 270 degrees as well.

If this made your day, please drop a comment.

Recommendation

Try my Open Source PHP visitor analytics script CrazyStat.

2. February 2020

MySQL root password in Ubuntu cannot be changed

Filed under: DBMS,Linux,Server Administration — Tags: , , , , , — Christopher Kramer @ 16:08

You tried a dozen different howtos to change the root password of MySQL (5.7+) in a recent Ubuntu version (18.04+) and did not succeed? Like the one I posted in 2013?

The reason these guides do not work is simple: root access through password is disabled and thus changing the password has no effect. You can find more details here.

So how the heck can we access the database? On the console, you can login to MySQL as root without a password like this:

sudo mysql

If you need root access from another application, like phpMyAdmin, the best way is to add a new user like myroot that has all privileges and a password. To do so, login as root in the console (sudo mysql) and then create the new user like this (adjust new_password to something more secure):

CREATE USER 'myroot'@'localhost' IDENTIFIED BY 'new_password';
GRANT ALL PRIVILEGES ON *.* TO 'myroot'@'localhost' WITH GRANT OPTION;
CREATE USER 'myroot'@'%' IDENTIFIED BY 'new_passord';
GRANT ALL PRIVILEGES ON *.* TO 'myroot'@'%' WITH GRANT OPTION;
FLUSH PRIVILEGES;
QUIT;

Now you can login from any application using the username myroot and the password new_password . On the console:

mysql -u myroot -p
Enter password: new_password

Hope this helps somebody who is in the same situation like me.

If this made your day, please drop a comment.

13. January 2020

TeXworks: Editor Window opens without Titlebar, no way to minimize

Filed under: Linux — Tags: , , , , , , , , , — Christopher Kramer @ 11:33

I was using TeXworks 0.6.2 to edit LaTeX files under Ubuntu Linux 18.04 (using Gnome with X11). Suddenly, a file that I had edited before would always open in a strange way. The preview window with the PDF would open normally. But the editor opened maximized without a titlebar, window border etc. So there was no way to minimize the editor window.

I tried to minimize the window using keyboard commands and the Window-Menu of the TeXworks editor. I managed to move the window to a different screen using keyboard commands, but still maximized without a titlebar. The window menu also did not work. Restarting TeXworks also did not help. Other files would open normally.

What finally helped: File / Remove Aux Files…
Afterwards, restart TeXworks.

I did not know that TexWorks stores window status information in aux-files. But it seems it does, as deleting these files solved the problem.

If this tip saved your day, please drop a comment. This motivates me to keep writing these kind of posts.

4. December 2019

letsencrypt certbot: how to remove some domains from an existing certificate

Filed under: Linux,Server Administration — Tags: , , , , — Christopher Kramer @ 21:44

You have a certificate with a couple of alternative domain names added to it, but want to get rid of some of them while keeping others? The parameter --renew-with-new-domains is what you want. This is how you use it:

certbot certonly --cert-name "maindomain.com" --renew-with-new-domains -d "maindomain.com,alternative1.com,alternative2.com"

This will renew the certificate maindomain.com with the domains maindomain.com, alternative1.com and alternative2.com. Any other domains that had been included in the certificate before will not be included in the new certificate. If you execute it like this, it will ask you for the verification method and parameters interactively. Alternatively, you can also configure this with parameters like -a webroot --webroot-path "/var/www/” .

24. August 2018

Clementine Music Player needs to be started twice, no window on first start

Filed under: Linux — Tags: , , , , , , , , — Christopher Kramer @ 15:01

clementine music player logoIn Ubuntu 18.04, I start Clementine Music Player, but no window is coming up. But once I start Clementine another time, it comes up.

This is not a bug, it is a setting. So this is what you want:

Tools -> Preferences -> Behaviour -> When Clementine starts -> Always show the main window

No, you are not alone, it is you, me, and a bunch of other people.

9. August 2018

Debian Unattended Upgrades: Upgrade Third Party mono packages (sury.org, icinga)

When using the official third-party repository of mono in Debian, unattended Upgrades will not upgrade the mono packages unless you allow the origin. To do so, edit your /etc/apt/apt.conf.d/50unattended-upgrades , which may look like this:

Unattended-Upgrade::Origins-Pattern {
      "o=Debian,n=${distro_codename}";
      "o=Debian,n=${distro_codename}-updates";
      "o=Debian,n=${distro_codename}-proposed-updates";
      "o=Debian,n=${distro_codename},l=Debian-Security";
};

To also update mono packages on Debian Stretch, add XamarinStretch as Origin:

Unattended-Upgrade::Origins-Pattern {
      "o=Debian,n=${distro_codename}";
      "o=Debian,n=${distro_codename}-updates";
      "o=Debian,n=${distro_codename}-proposed-updates";
      "o=Debian,n=${distro_codename},l=Debian-Security";
      "o=XamarinStretch";
};

If you use another Debian version or Distribution, like Jessie or Ubuntu, search for the file /var/lib/apt/lists/download.mono-project.com_repo_*_InRelease and check the “Origin: ” line and adjust the origin in the config file accordingly.

Repositories with empty Origin like packages.sury.org

If you find that the Origin of the packages in the repository is not given, then you can also tell unattended upgrade to select them based on the given site. For example, this works for the packages from sury.org:

"site=packages.sury.org";

Icinga repository

The packages.icinga.com Repository has the Origin “debian icinga-stretch”, so this is what you need to add to /etc/apt/apt.conf.d/50unattended-upgrades:

"o=debian icinga-${distro_codename}";

Test your changes

To test if it works, you can run unattended updates manually like this (as root or with sudo):

unattended-upgrade -d

If this made your day or you still have problems, just drop a comment.

3. August 2018

iptables: Accept IP address of current ssh client

Filed under: Linux,Security,Server Administration — Tags: , , , , — Christopher Kramer @ 20:39

You have some service, e.g. webmin, that should not be accessible to the public and block access with iptables? And sometimes you connect from a client that is not yet whitelisted in iptables, and always need to look up its IP and add an iptables rule by ssh. Here is a small shell one-liner that makes your life easier:

iptables -I INPUT -p tcp -s `echo $SSH_CLIENT | awk '{ print $1}'` --dport 10000 -j ACCEPT

This just adds an accept rule to iptables that accepts requests from the IP address of the ssh client to port 10000. Of course, you need to adjust the port. You can just paste this in a bash-script, add a bash alias for it or whatever you want to access it fast.

To remove the iptables rule, just replace -I with -D:

iptables -D INPUT -p tcp -s `echo $SSH_CLIENT | awk '{ print $1}'` --dport 10000 -j ACCEPT

You can create one script or shell alias or for each one for easy access.

If this made your day, just leave a comment.

17. July 2018

Debian Stretch: Adjust the CPU priority (nice level) of systemd daemons like spamassasin, amavisd-new, clamd etc.

The good old days: init.d

When still using Debian Wheezy, I configured my spamassasin service to run at a nice level of 10 so it does not slow down apache, mysql, php etc. To do so, I noticed in /etc/init.d/spamassasin a parameter called NICE with a comment saying I should not touch this and instead, go into /etc/default/spamassassin. So I adjusted this file, and on my Debian Stretch, it still looks like this:


# /etc/default/spamassassin
# Duncan Findlay

# WARNING: please read README.spamd before using.
# There may be security risks.

# Change to one to enable spamd
ENABLED=1

# Options
# See man spamd for possible options. The -d option is automatically added.

# SpamAssassin uses a preforking model, so be careful! You need to
# make sure --max-children is not set to anything higher than 5,
# unless you know what you're doing.

OPTIONS="--create-prefs --max-children 5 --helper-home-dir"

# Pid file
# Where should spamd write its PID to file? If you use the -u or
# --username option above, this needs to be writable by that user.
# Otherwise, the init script will not be able to shut spamd down.
PIDFILE="/var/run/spamd.pid"

# Set nice level of spamd
NICE="--nicelevel 10"

# Cronjob
# Set to anything but 0 to enable the cron job to automatically update
# spamassassin's rules on a nightly basis
CRON=1


This had worked well on Debian Wheezy. Now I noticed that on Debian Stretch, the spamassasin service is running with a nice level of 0, so basically this has no effect. This is because Debian now uses systemd and these init.d files are magically transformed into systemd units and there, the nice level cannot be adjusted like this. The complete story is a lot longer and complex, but I don’t want to bother you here.

How to adjust the nice level of services on Debian Stretch

First, check the location of the unit file of your service. To do so, run:

systemctl status spamassassin.service

It will output something like:

● spamassassin.service - Perl-based spam filter using text analysis
   Loaded: loaded (/etc/systemd/system/spamassassin.service; disabled; vendor preset: enabled)
   Active: active (running) since Tue 2018-07-17 16:07:26 CEST; 19min ago
 Main PID: 946 (/usr/sbin/spamd)
    Tasks: 3 (limit: 4915)
   CGroup: /system.slice/spamassassin.service
           ├─946 /usr/sbin/spamd -d --pidfile=/var/run/spamd.pid --create-prefs --max-children 5 --helper-home-dir
           ├─949 spamd child
           └─950 spamd child

Jul 17 16:07:23 systemd[1]: Starting Perl-based spam filter using text analysis...
Jul 17 16:07:26 systemd[1]: Started Perl-based spam filter using text analysis.


In the line “Loaded”, it gives the location of the unit file, in this case:

/etc/systemd/system/spamassassin.service

In your case, it is probably:

/lib/systemd/system/spamassassin.service

If it gives the path to /etc/init.d/ and says “generated” under loaded, as it does e.g. for amavisd-new, then you will probably find the unit file automatically generated by systemd-sysv-generator in one of these paths:

/run/systemd/generator.late
/run/systemd/generator.early
/run/systemd/generator

If your unit file is not already in etc, copy the file from where it is now to /etc, e.g. like this:

cp /lib/systemd/system/spamassassin.service /etc/systemd/system/

If your file is already in /etc, then just go ahead and edit this.

Now open the file /etc/systemd/system/spamassassin.service – it will look like this:

[Unit]
Description=Perl-based spam filter using text analysis
After=syslog.target network.target

[Service]
Type=forking
PIDFile=/var/run/spamd.pid
EnvironmentFile=-/etc/default/spamassassin
ExecStart=/usr/sbin/spamd -d --pidfile=/var/run/spamd.pid $OPTIONS
ExecReload=/bin/kill -HUP $MAINPID
StandardOutput=null
StandardError=null
Restart=always

[Install]
WantedBy=multi-user.target

Now adjust it so after [Service] and before [Install], it sets the nice level like this:

[Unit]
Description=Perl-based spam filter using text analysis
After=syslog.target network.target

[Service]
Type=forking
PIDFile=/var/run/spamd.pid
EnvironmentFile=-/etc/default/spamassassin
ExecStart=/usr/sbin/spamd -d --pidfile=/var/run/spamd.pid $OPTIONS
ExecReload=/bin/kill -HUP $MAINPID
StandardOutput=null
StandardError=null
Restart=always
Nice=10

[Install]
WantedBy=multi-user.target


Now reload the systemd-daemon:

systemctl daemon-reload

And restart your service:

systemctl restart spamassassin.service

Now check the nice level of your spamd processes, it should be 10 now.


If this made your day or you still have problems, please let me know in the comments.
9. June 2017

Automatically run WP-CLI as the correct user

Filed under: Linux,Server Administration,Wordpress — Tags: , , , , , , — Christopher Kramer @ 19:04

You are root, your php runs with a different user for each site / customer e.g. using PHP-FPM. And these users don’t have a shell assigned. So how can you easily run wp-cli with the correct user to avoid permission denied-problems?

This is how: Define an alias for wp in your shell config, e.g ~/.bash_profile like this:

alias wp='sudo -u `stat -c '%U' .` -s -- php /usr/local/wp-cli.phar --path=`pwd` '

This will first run stat -c %U . to get the owner of the current folder. Then it will pass this to sudo to execute the command as this user. You might need to adjust the path to the phar-file.

Relogin so the alias takes effect and have fun! 🙂

Now when you are in the folder of some site and run wp-cli with the wp command, it will always automatically run with the user that is the owner of the wordpress-folder, which should be the user assigned to this site.

This is tested on a Debian Wheezy system. On FreeBSD, you would need to adjust it slightly:

alias wp='sudo -u `stat -f '%Su' .` -s -- php /usr/local/wp-cli.phar --path=`pwd` '

Let me know if this saved your day or you still have some problems.

26. March 2017

Zimbra: fix corrupt index open_conversation in an mboxgroup MySQL-DB

Filed under: DBMS,Linux,Server Administration — Tags: , , , , , , — Christopher Kramer @ 20:50

Just wanted to upgrade a Zimbra server from 8.7.3 to 8.7.5. The upgrade always asks you whether to check database integrity. Even it was only a minor upgrade, I chose yes to be on the safe side. And it turned out the MySQL DB was indeed corrupt.

I had seen corrupt zimbra dbs a lot and the “MySQL crash recovery” guide in the zimbra wiki always helped out. But not this time.

I tried the crash recovery as explained in the wiki. When doing dumps, four mboxgroup-databases always failed because the index open_conversation of the table open_conversation was corrupt. As the guide explains, I increased innodb_force_recovery step by step from 1 to the maximum 6, but the error did not go away.

So here is what helped:

  1. Try to create the dumps as explained in the crash recovery guide. You will get errors like this:
    Dumped mboxgroup8
    mysqldump: Error 1712: Index open_conversation is corrupted when dumping table `open_conversation` at row: 0
    Dumped mboxgroup9

    This means that mboxgroup9 (not 8!) is corrupt. Write down all the mboxgroup numbers where an error appeared.

  2. Remove  innodb_force_recovery from the my.cnf if you inserted it
  3. Login as zimbra
    su zimbra
  4. Restart the mysql server
    mysql.server restart
  5. Load the MySQL account data into shell variables
    source ~/bin/zmshutil ; zmsetvars
  6. Log into MySQL using the root account
    mysql -u root --password=$mysql_root_password
  7. Open the first database that is corrupt:
    USE mboxgroup9;
  8. Repair the corrupt open_converstation table:
    OPTIMIZE TABLE open_conversation;

    Note: If this fails, check if you really removed innodb_force_recovery from the my.cnf!

  9. Go back to step 7 and open the next database that is corrupt until all have been repaired.
    Now exit the MySQL prompt:

    exit;
  10. You can now continue with the crash recovery, it should now create all dumps correctly. But if the open_conversation tables where the only corruption problem, you could also just stop here as this should have fixed the corruption. In my case, I jus started the upgrade again and let it verify message store database integrity again, and this time it completed with “No errors found”. 🙂
  11. Clean up the MySQL dumps
     rm -R /tmp/mysql.db.list /tmp/mysql.sql/

Please let me know if this helped you or if you have some additions.

Older Posts »